Zoom+ Rooms and Trimodal Rooms are software-based teaching spaces that allow for the integration of audio conferencing, wireless screen sharing, and video conferencing. This allows for students to attend class either in-person or remotely through a Zoom meeting.
-
Zoom+ Rooms are equipped with a camera, projector, and microphone to host Zoom meetings and facilitate screen sharing and digital whiteboards.
-
Trimodal Rooms have the same features as Zoom+ Rooms and use additional cameras, including a document camera, to allow instructors to switch between screens. Trimodal Rooms use TV monitors instead of projectors, one of which is an additional touch screen that can be used during meetings.
For information on getting started in Zoom+ and Trimodal Rooms, see the following sections:
For best practices for setting up Zoom meetings, see these sections:
For instructions on using Zoom and its features in a Zoom+ or Trimodal Room, see the following:
Set up a Meeting
To ensure that all students will have access to the Zoom link, meetings for Zoom+ and Trimodal Rooms should be scheduled through D2L.
- From the course site, select
Edit Course.
- Select
Zoom.
- Select
Schedule a New Meeting.
- Input the meeting information. (See
Creating a Zoom Meeting for more information on meeting settings.)
Note: Be sure the setting "Enable join before host" is
not enabled.
- Select
Save when finished.
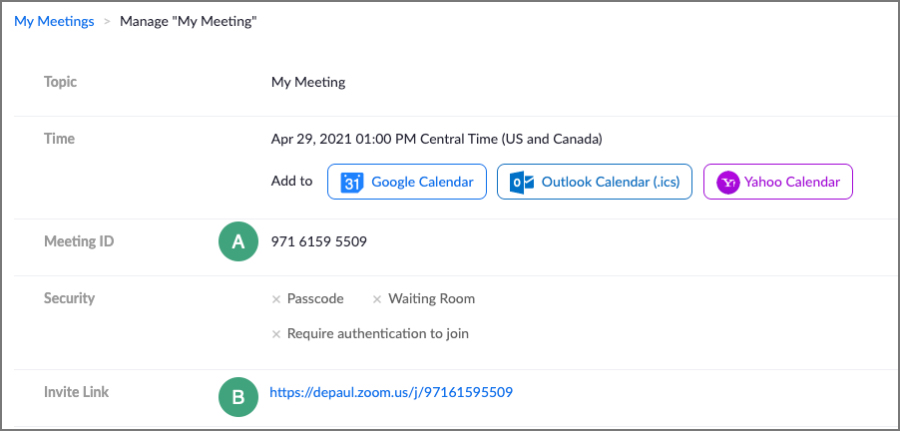
- On the page that opens, copy down the Meeting ID [A]. To access the meeting from the Zoom+ or Trimodal Room, instructors will need to input the Meeting ID into the podium computer and the passcode (if set).
- The session link will be added to the Course Calendar. It is recommended to also add a direct link to the meeting within the course by copying and pasting the Invite Link [B].
Find Host Key
All Zoom users have a unique host key. For ease of hosting in a Zoom Room, record the host key along with the Meeting ID. This key should be kept private.
- Go to
depaul.zoom.us.
- Sign in with DePaul credentials.
- Select
Profile.
- Scroll to the "Meeting" section.
- The host key will be blocked out with asterisks. Select the
closed eye icon to reveal the host key and record it.
Check for Updates
Keep the Zoom desktop client updated to ensure that the latest version is being used.
- Open and sign into the Zoom desktop client.
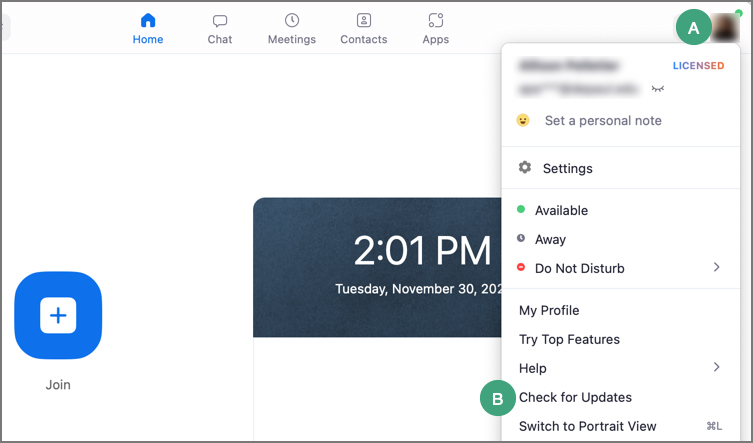
- Select the
profile picture or
initials [A].
- A menu will open. Select
Check for Updates [B].
- Allow the update to download, then select
Update.
^^ Back to top
Turn on Technology
Zoom+ Rooms and Trimodal Rooms need to have the touch screen monitor and Desktop Content PC turned on if not on already. In Zoom+ Rooms, the projector will also need to be turned on.
Turn on the Projector
- Press the ON button on the remote control.
- Wait for the status light on the projector to become solid.
Note: The lamp may take up to 20 seconds to warm up.
Turn on the Touch Screen Monitor
Tap the monitor that is labeled
Touch Screen to wake up the Zoom computer and view the Zoom menu.
Turn on the Desktop Content PC
Move the mouse or tap the keyboard to wake up the content PC.
^^ Back to top
Share Content without Zoom
If all students are joining class in-person, instructors can share content using either the Desktop PC or another device.
Share Content with the Desktop Content PC
- Tap the monitor labeled
Touch Screen to wake up the Zoom monitor and view the Zoom menu.
- Move the mouse or tap the keyboard to wake up the content PC.
- Tap
Content PC on the main Zoom menu.
- On the popup that opens, tap Share to Meeting.
- Press
Ctrl+Alt+Delete on the keyboard to log into the content PC and use it as normal.
Note: If the PC goes to sleep, the “Start Sharing” option will not display, in its place will be “Plug HDMI cable into device.” This message is misleading as there is no HDMI cable to be plugged in. The PC just needs to be woken up by moving the mouse or tapping the keyboard.
Share Content with a Laptop/Tablet/Phone
- Connect the device to WI-FI as this room does not offer a physical cable.
- Tap
Share Content on the podium touch screen monitor.
- Choose an option for sharing:
-
Zoom App: Share screen using the Zoom desktop client. To use, type in the sharing key that displays on the podium touch screen monitor.
-
Use Browser: Share from an external device by navigating to the meeting via share.zoom.
- Type in meeting ID on an external device.
- Tap
Share Screen from the toolbar menu.
- Enter meeting passcode.
- Select the
window to share.
^^ Back to top
Start a Meeting
The Meeting ID is needed to start a meeting in a Zoom+ or Trimodal Room. If a passcode has been set for the meeting, this will be entered as well.
- Turn on the computer and tap the
screen.
- (In Zoom+ Rooms) Turn on the projector using the remote.
- Ensure monitor is on and displaying the Zoom menu.
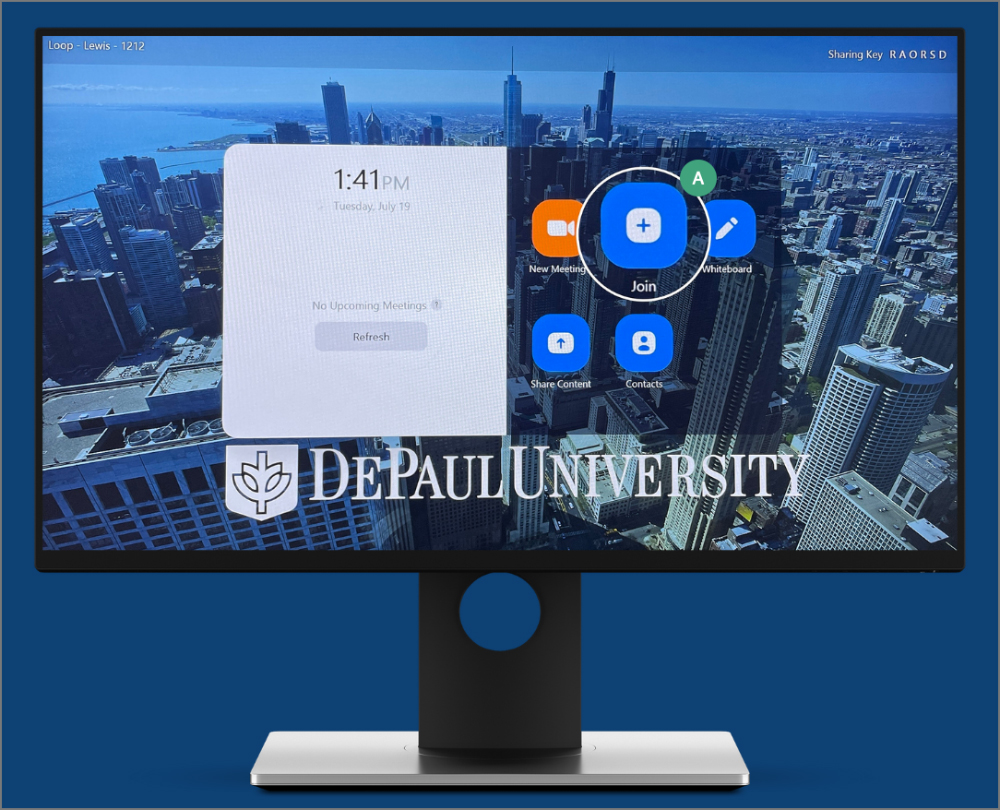
- On the touch screen monitor, select
Join [A].
- Enter the Meeting ID.
- Enter the passcode if one was set.
- The meeting will begin with the Zoom+ or Trimodal computer as the host.
Note: The room as the host will have limited capabilities.
Change View
- Select
View in the meeting toolbar.
- Choose one of the options:
^^ Back to top
Share a Screen
- Select
Share Screen on the meeting toolbar.
- Choose an option for sharing:
-
Zoom App: Share from an external device using the Zoom desktop client.
- Connect the device to WI-FI as the room does not offer a physical cable.
- Type in the sharing key that displays on the podium touch screen monitor.
-
Use Browser: share from an external device by navigating to the meeting via share.zoom.
- Type in meeting ID on an external device.
- Tap
Share Screen from the toolbar menu.
- Enter meeting passcode.
- Select the
window to share.
-
Use laptop with Content PC: Display documents, files, web pages, etc. from the desktop PC.
- Tap
Start Sharing.
Note: If the PC goes to sleep, the “Start Sharing” option will not display, and in its place will be “Plug HDMI cable into device.” This message is misleading as there is no HDMI cable to be plugged in. The PC just needs to be woken up by moving the mouse or tapping the keyboard.
- Press
Ctrl+Alt+Delete on the keyboard to log in and use PC as normal.
- To have a student share, select
Advanced Sharing Options.
- Under "Who Can Share?" select
All Participants.
Use the Document Camera
In Trimodal Rooms, there is also a document camera that can be used in class meetings.
- Slide the power button on and lift the armature up.
- Select
Share Screen on the Zoom meeting toolbar.
- Select
Start Sharing.
- When finished, slide the power button into the off position. The image will default back to the Content PC if that was displayed previously.
^^ Back to top
Use a Whiteboard
Zoom Rooms will have two available options for creating a whiteboard:
-
Whiteboard Classic: A legacy version of the whiteboard that allows for simple drawing or collaborative activities
-
Whiteboard New: An updated version that offers more options for sharing the whiteboard and templates for collaborative work
Use Whiteboard Classic
- Select
Whiteboard on the meeting toolbar.
- Select
Whiteboard (Classic).
- For accessibility, it is recommended to change the background of the whiteboard to black by selecting the
moon icon [A].
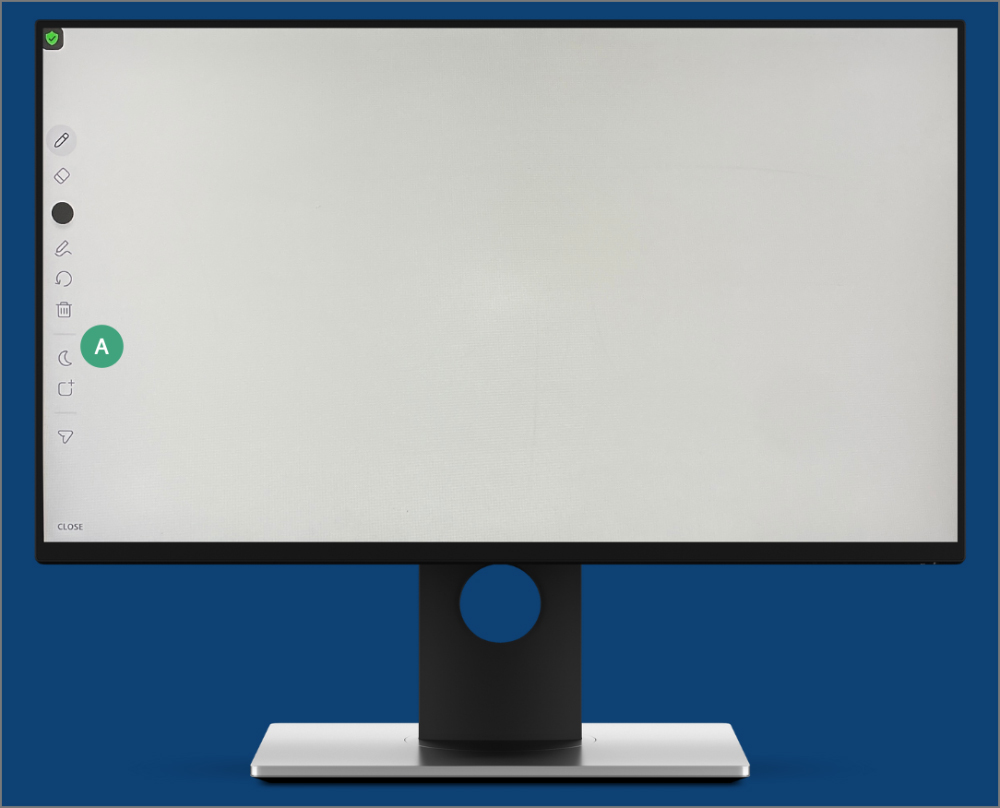
- Use the touch-screen monitor to draw or write on the whiteboard.
- To close the whiteboard, select
Close.
- An option to send the whiteboard will open. Skip this or enter an email address to save.
Use Whiteboard New
- Select
Whiteboard on the meeting toolbar.
- Select
Whiteboard (New).
- Choose whether all participants will be able to
Edit or just
View the whiteboard.
- Choose additional sharing options.
Note: If a whiteboard is created in a scheduled meeting, it will automatically be shared with the creator of the meeting via email.
- Select a
template from the available options or select
New to open a blank whiteboard.
- Use the touch-screen monitor to draw or write on the whiteboard.
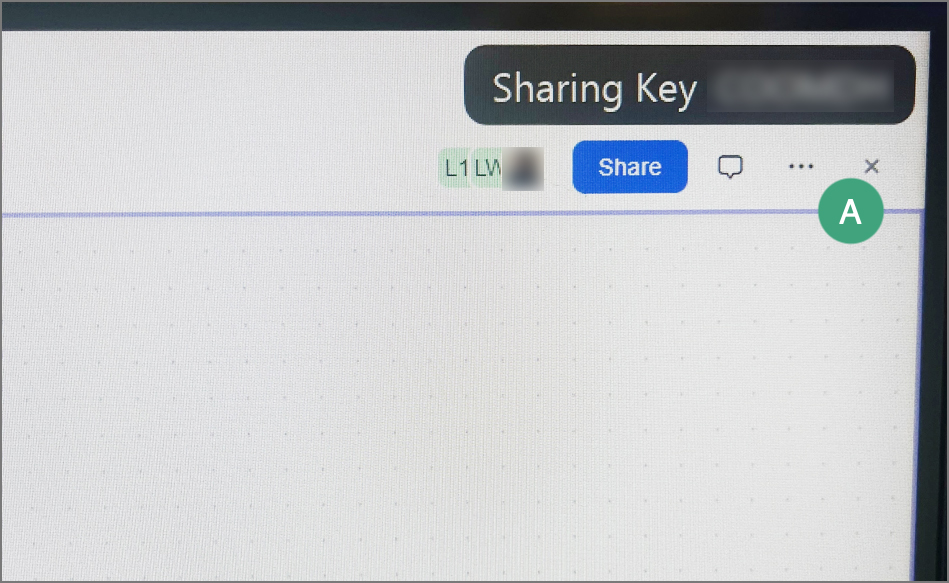
- Once finished, select the
X in the upper corner of the whiteboard near the sharing key [A].
^^ Back to top
Use Additional Controls
Other features can be accessed by selecting the ellipsis (More) on the meeting toolbar.
Change Camera Settings
By default, both the front and back cameras are on.
- Select
More.
- Select
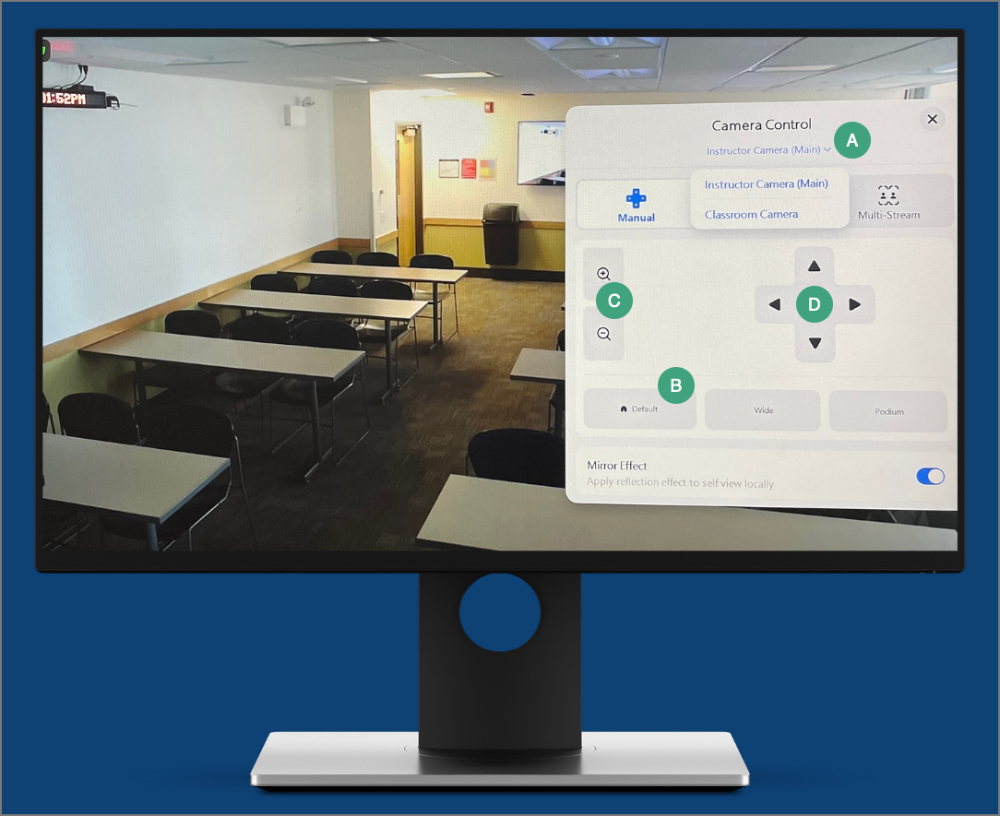
Camera Control.
- By default, the Manual settings page will open. There are three main options for adjusting the camera movement:
-
Manual: Camera settings are manually adjusted using controls for panning and zooming as well as pre-set options.
-
Auto-framing:
(Not recommended) The camera will automatically readjust and capture a full view of the room. This option is not recommended as it may attempt to capture images on the room monitors.
-
Multi-stream: The “instructor” camera will capture streams of multiple room participants based on movement.
- When "Manual" is selected, select the
camera name to reveal a dropdown list with both camera names [A].
- Select the
name of the camera for which to change settings. The "Instructor" camera is in the rear of the room, facing the instructor. The "Classroom" camera is in the front, facing the class.
- Choose from 3 preset options [B].
- (Optional) Use the + and - buttons to further adjust zoom in and out [C].
- Use the arrows to pan the camera in different directions [D].
Record the Meeting
- Select
More .
- Select
Start Recording .
- To end the recording, select
Stop Recording.
- The recording link will be sent to the email of the host that scheduled the meeting.
Record a Class in a Flex Room
Flex courses are not recorded automatically. If instructors plan to share class recordings in D2L, it is recommended to do the following:
- Set up Zoom sessions that will automatically record to the cloud (see
Creating a Zoom Meeting).
-
Add a Zoom link to the Content of the D2L site. This will act as a repository for the class recordings that students can access.
Use Breakout Rooms
Breakout rooms can be pre-assigned or created in a meeting. See
Creating Pre-Assigned Breakout Rooms for information on creating groups ahead of time.
Enable Breakout Rooms
Before breakout rooms can be used in a meeting, users must change settings from the Zoom web portal. See the instructions to
Enable Breakout Rooms for information.
Open Breakout Rooms
- From the meeting toolbar, select
More.
- Select
Breakout Rooms.
Note: If breakout rooms were pre-assigned, use the instructions to
Open Pre-Assigned Breakout Rooms.
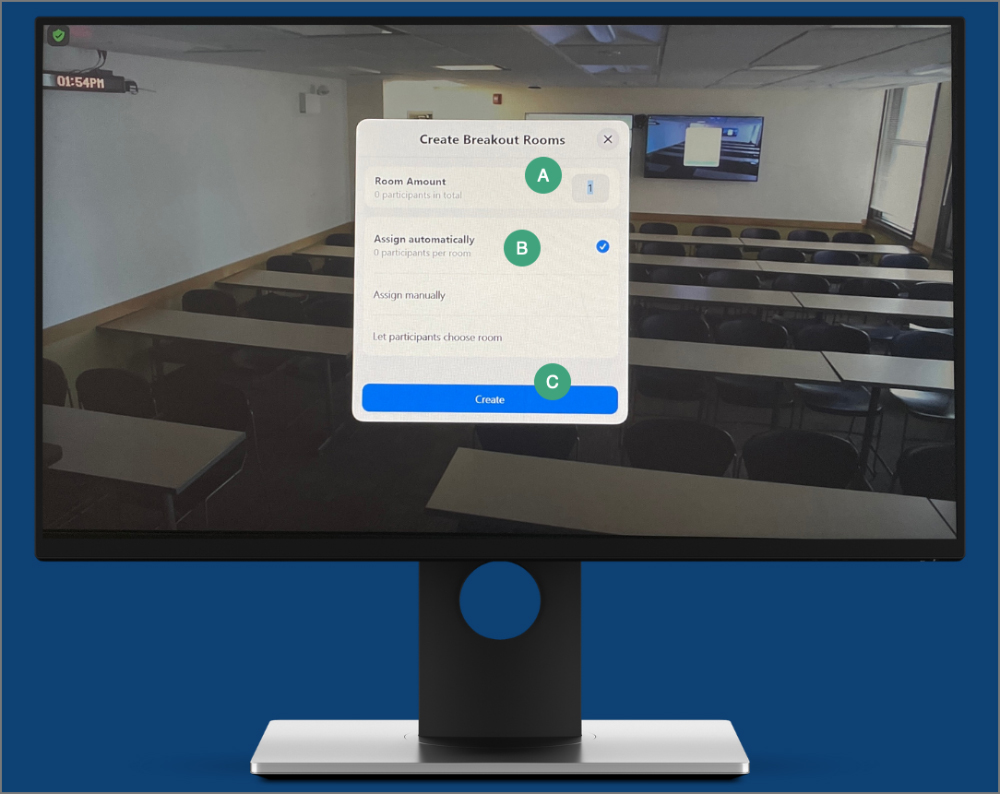
- A popup window will open. Input the number of breakout rooms to create [A].
- Choose whether to assign participants manually or automatically [B].
- Select
Create [C].
- Once groups have been created, select
Open All Rooms.
- To join a breakout room, the host can use the "Join" button from the breakout room assignment window.
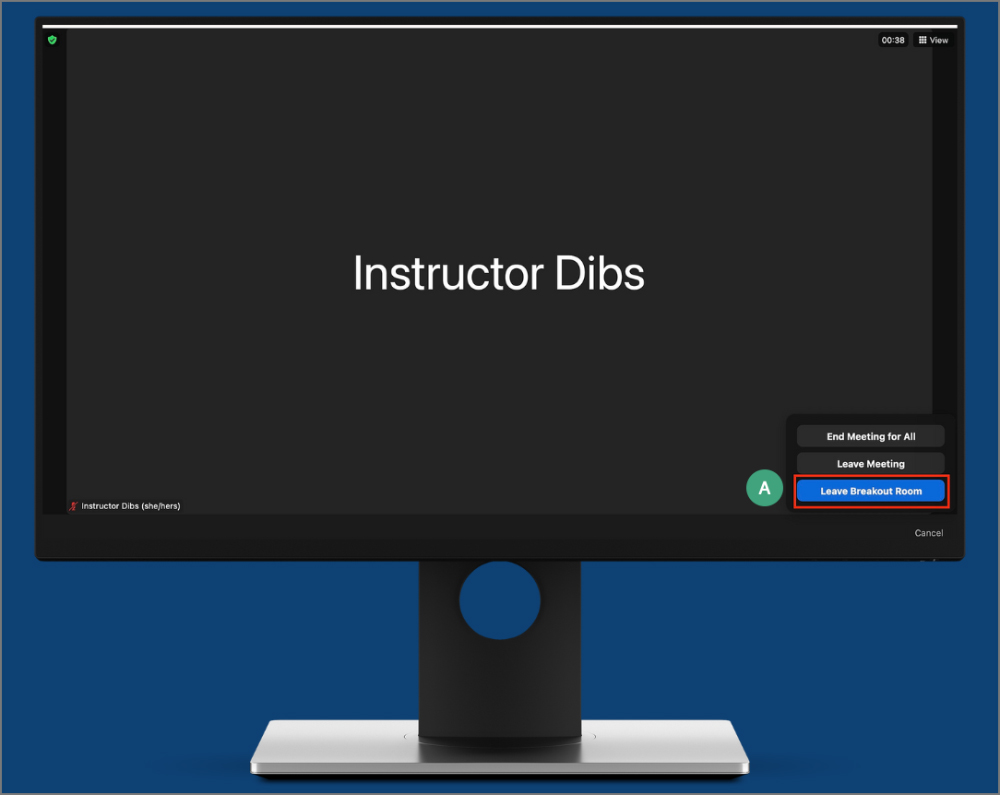
- To leave a breakout room, select
Leave. Then, select
Leave Breakout Room [A].
- To join a different breakout room, select
More in the meeting toolbar. Then, select
Breakout Rooms again to pull up the "Breakout Room Assignment" window.
Use Live Transcription
For accessibility purposes, live transcription and captions can be turned on during a class meeting.
- From the meeting toolbar, select
More.
- Select
Settings.
- In the "Transcription" tab, select the
toggle for Live Transcription.
- (Optional) Modify the caption size using the listed options.
- When finished, exit the "Settings" window.
- All users will be able to see the captions.
Use Polls
Premade polls can be used within a meeting in a Zoom Room. Polls cannot be deployed if a new meeting has been created and started from the desktop, and they cannot be created from the desktop. Polls can only be deployed if the meeting and poll(s) were created ahead of time. See
Zoom's guide on creating polls for more information on creating premade polls.
The Zoom Room must be host or cohost of the meeting to deploy a poll.
- From the meeting toolbar, select
More.
- Select
Polls/Quizzes.
Note: This option will only be available if there are premade polls attached to the meeting. See
Zoom's guide on creating polls for more information.
- A window will open displaying the available polls. Select the
poll to launch.
- The poll question will display. Select
Launch Poll.
^^ Back to top
Use the Zoom Client in a Zoom Room
Some standard Zoom features are not accessible from the podium monitor in a Zoom Room. To use these features, instructors can download the Zoom client to their laptop and bring it into the Zoom Room. The Zoom client can be downloaded from
depaul.zoom.us.
To use a laptop in a Zoom Room, note that the audio and microphone on the laptop must be muted.
Note: For large classes or classes in which these tools will be used frequently, instructors can request an Online Learning Assistant (OLA). Instructors can meet with the
instructional designer assigned to their department to decide if an OLA would be beneficial.
Mute Zoom Client Audio
In order to use a laptop and the Zoom client in a Zoom Room, the microphone and audio on the laptop must be muted once the meeting has been started.
- On the laptop, use the Zoom client to start the meeting.
- If not muted by default, mute the microphone by selecting the
microphone.
- Mute audio on the laptop. Depending on the laptop model, this setting may be on the keyboard or in the system preferences.
Use Chat
Chat is available in Zoom+ and Trimodal Rooms on the podium monitor. However, if chat is necessary for the class meeting, it is recommended to use a laptop with the Zoom client for ease of viewing notifications and for the ability for the host to respond to participants. See the Zoom page on
Using in-meeting Chat for more information.
Pair a Whiteboard
To assign a participant as owner, allowing for additional sharing options, users can pair a laptop with a whiteboard. This option is only available with Whiteboard New.
- With the whiteboard up on the desktop monitor, select the
pairing icon in the Zoom client [A].
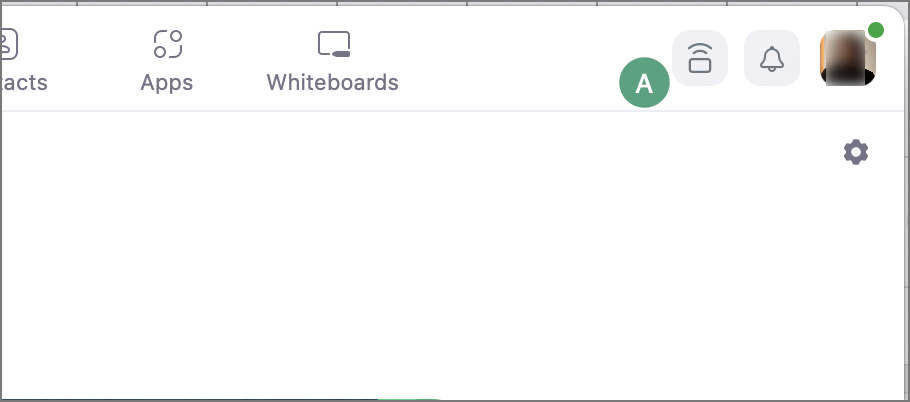
- When prompted in the Zoom client, choose self as owner.
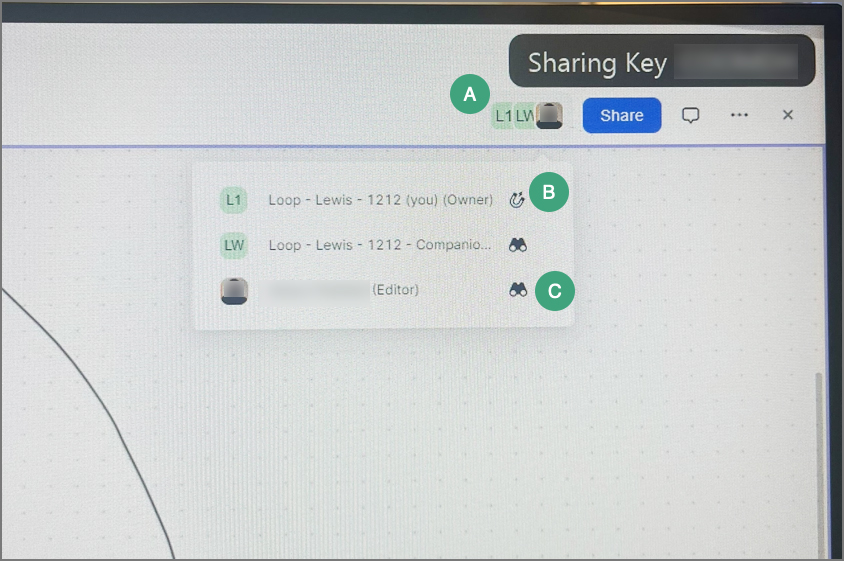
- On the desktop monitor, select the
participant icons [A].
- To request that participants follow along with edits as they are made, select the
magnet icon next to the picture of the participant to follow [B]. To request to follow another collaborator, select the
binoculars icon next to the collaborator's picture [C].
- Continue using the whiteboard. To navigate between pages, select the
page icon [A].
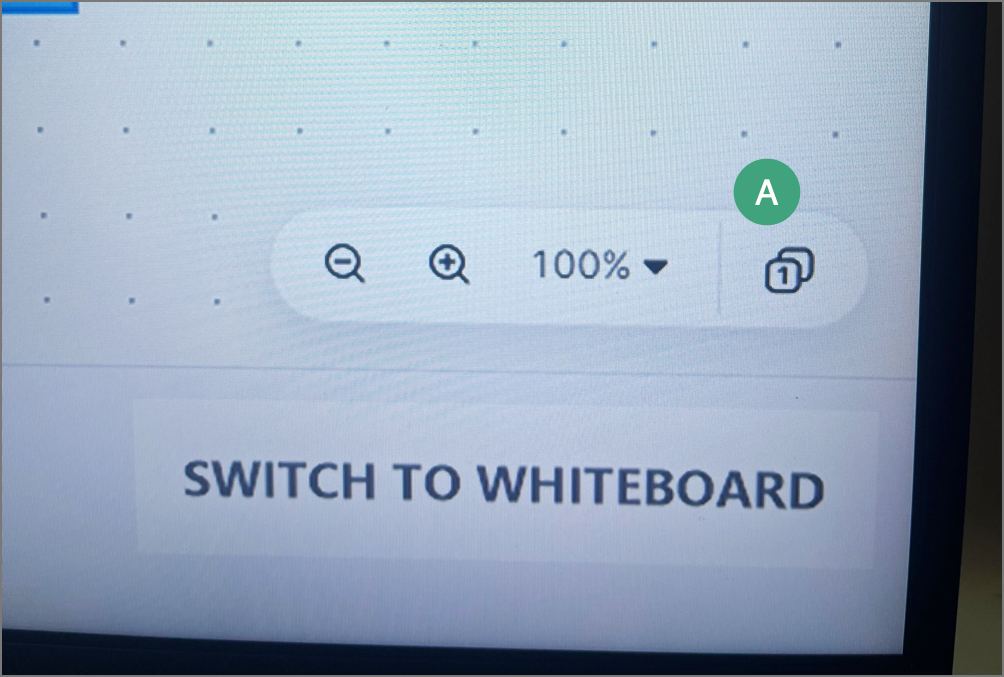
Note: This icon may be hidden behind the participant count.
^^ Back to top