The HTML Editor is a text box that allows users to edit text and insert elements like images, videos, and tables. The HTML editor in D2L appears throughout D2L in a number of tools:
In addition to the items above, the HTML Editor appears when adding instructions to Submission folders, Quizzes, and Discussion topics and forums.
The HTML editor can be used in the following ways:
When using the HTML Editor, it is important to check for accessibility to ensure that content is accessible for all students. See the section on
Using the Accessibility Checker for more information.
Insert a Link
There area two types of Quicklinks in the HTML editor: external links to websites outside of the D2L course and relative links to other parts of the D2L course site.
Insert a Link to an External Website
- Select the location for the link within an html text box.
- Select the Insert Quicklink icon [A].

- A pop-up window will open. Select
URL from the list.
- Enter the link in the “URL” field.
- Enter the text to be displayed in the "Title" field.
- Choose how the link should open. To ensure that the course is accessible to all users, the best practice is to choose "Same Frame."
- Select
Insert.
Insert a Link to an Item in a Course Site
- Select the location for the link within the textbox.
- Select the
Insert Quicklink icon.
- Choose the type of activity from the options on the list.
- Select Submissions to select the folder from the list of existing folders.
- Select
Discussions to select a forum, then select the topic
from the list of existing topics.
- Select
News to select the news item from the list of existing items.
- Select
Self-Enrollment Groups to select a group for students to enroll in from the list of existing self-enrollment group categories.
Edit or Remove a Link
- Select the
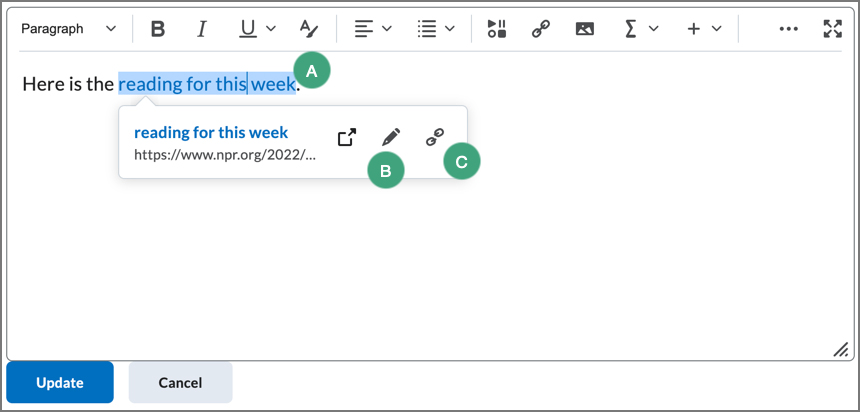
link within the HTML editor [A].
- A context menu will appear. Select the
pencil icon [B] to edit the link or its title.
- Select the
broken chain icon [C] to remove the link.

Insert an Image
Use the Insert Image function to add images to a text box.
Note: While images can be added in other ways, this is the recommended method as it prompts for an alt tag for users with screen readers. To ensure that images comply with accessibility standards, be sure to enter a descriptive alt tag for any images that are not solely decorative.
- Select where to place the image within the HTML textbox.
- Select the
Insert Image button [A].

- Choose the image location:
-
If the image is on the computer, select the
Upload button. Choose the file from the computer, then select Add.
-
If the image is located on the web, select URL. Enter or paste the web address for the image, then select
Add button.
- To ensure that the image is accessible to all users enter descriptive text for your image. Only select "This image is decorative" if the image contains no information valuable to the student.
- Select OK.
Insert an Audio File
- Select the
insert stuff icon [A].

- Select My Computer.
- Select
Choose File to choose the audio file.
Note: If choosing a .m4a audio file, the audio with autoplay when the question is opened. To avoid possible issues with multiple audio files playing at once, the file can be converted to .mp3.
- Select
Open to add the file.
- Select
Upload.
Add Headings
- Highlight the text to format.
- Select the
dropdown arrow next to "Paragraph," then select the heading style to apply. The text will be changed to this heading style.
Note: If the Paragraph dropdown menu is not immediately visible in the ribbon of options, select the
… icon to display all of its buttons.
Insert Code
In some courses, it may be necessary to insert a code snippet directly into the course Content. Using the HTML Editor, users can insert code in a variety of markup languages and format it before sharing it with others.
Note: The Insert Code option is not available in the Quizzes tool.
- Within the HTML Editor, select the
plus sign.
- Select
Insert Code.
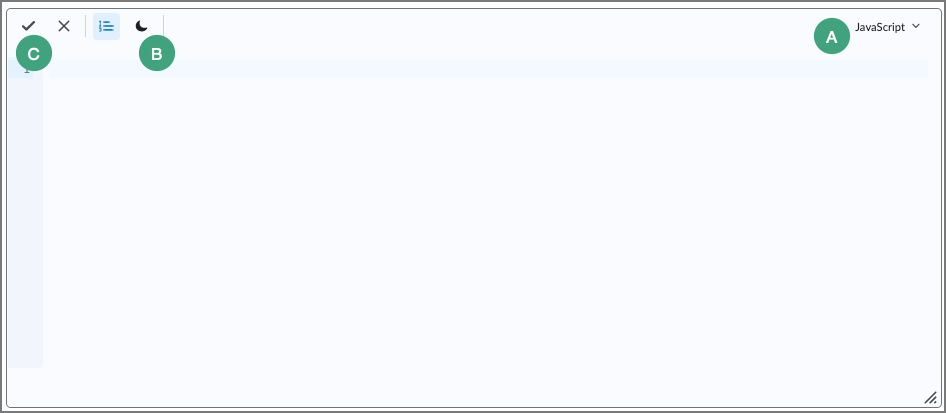
- A markup editor will open. Select the markup language [A].
- (Optional) Select the
moon icon to change the editor to dark mode [B].
- Add or paste code into the editor.
- When finished, select the
check mark [C].

- To edit the code again, select inside the
markup editor.
Embed Content with an Embed Code
These instructions are for embedding a video hosted on an external website, such as YouTube or Ooyala. This procedure can also be used to embed other content in D2L, such as Twitter feeds and calendars, as long as the site provides a secure embed code. To embed a local video file, refer to the Panopto guide.
- Copy the embed code from the host site.
- Select the
Insert Stuff icon [A].

- Choose Enter Embed Code.
- Paste the copied embed code.
- Select the
Next button.
- Select the
Insert button.
Note: An embed code is HTML code that can be added to the course site to display content stored in an external website. The embed code will be located in different places depending on which website is hosting the content.
Check for Accessibility
The HTML Editor in D2L has an Accessibility Checker tool that can help determine if the content entered is accessible. The Accessibility Checker looks for potential issues with font size, colors, lists, and other formatting choices.
- Navigate to a tool that has the HTML editor.
- Open the HTML Editor by selecting to
Edit an existing item or topic, or create a new one.
- Enter or edit content in the HTML Editor text box.
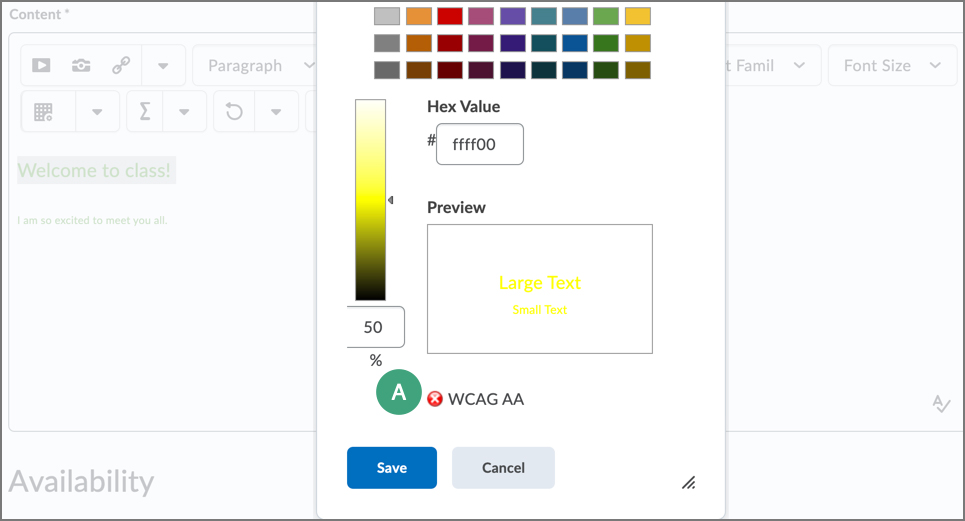
- If altering the font color, check for accessibility by looking for a green check mark or a red x [A].

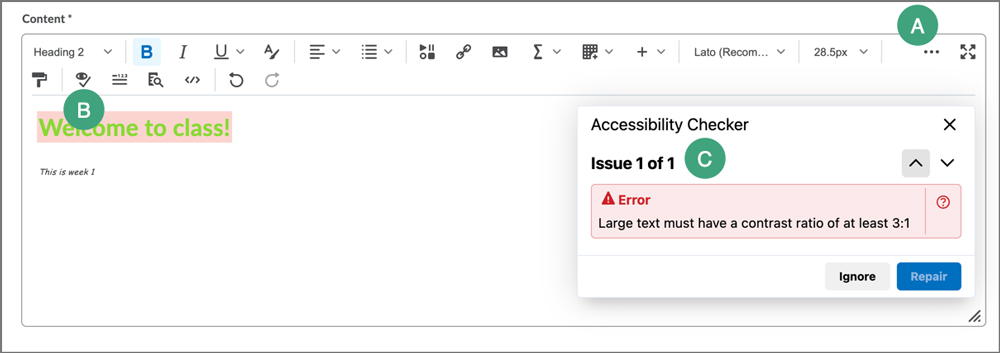
- Once text has entered or edited, select the ellipses [A].
- Then, select the eye with check mark icon [B].
- The Accessibility Checker will indicate if there are accessibility issues or if the content is accessible [C].

- If the content is flagged with an accessibility issue, make any changes, then check again.