As always, log in to edit the page in SharePoint by clicking Editor Login in the bottom right corner of the page, and enter your your BlueKey login credentials (username@depaul.edu email address and password). Next, click the Edit symbol at the top of the page, or go to the Page tab and click Edit.
If the ribbon does not appear, you can access it through the Site
Actions dropdown by selecting Show Ribbon, or edit the page directly
from the dropdown menu.
Video Gallery:
Embeding a single video on a page
Before you start, in another browser window or tab, go to the video in YouTube or Vimeo. Play the video and press pause when you see a nice scene and screenshot it. We then suggest opening your screenshot in Photoshop or another image editor to crop it appropriately, resize it to 800px wide and save it as a .jpeg or .jpg. FYI: You can use a screen capture of any scene in the video, but it must be a .jpg file. Leave the YouTube or Vimeo browser tab/window open so you can copy the video URL.
1. Go to the Insert tab in the ribbon, and click on Web Part.
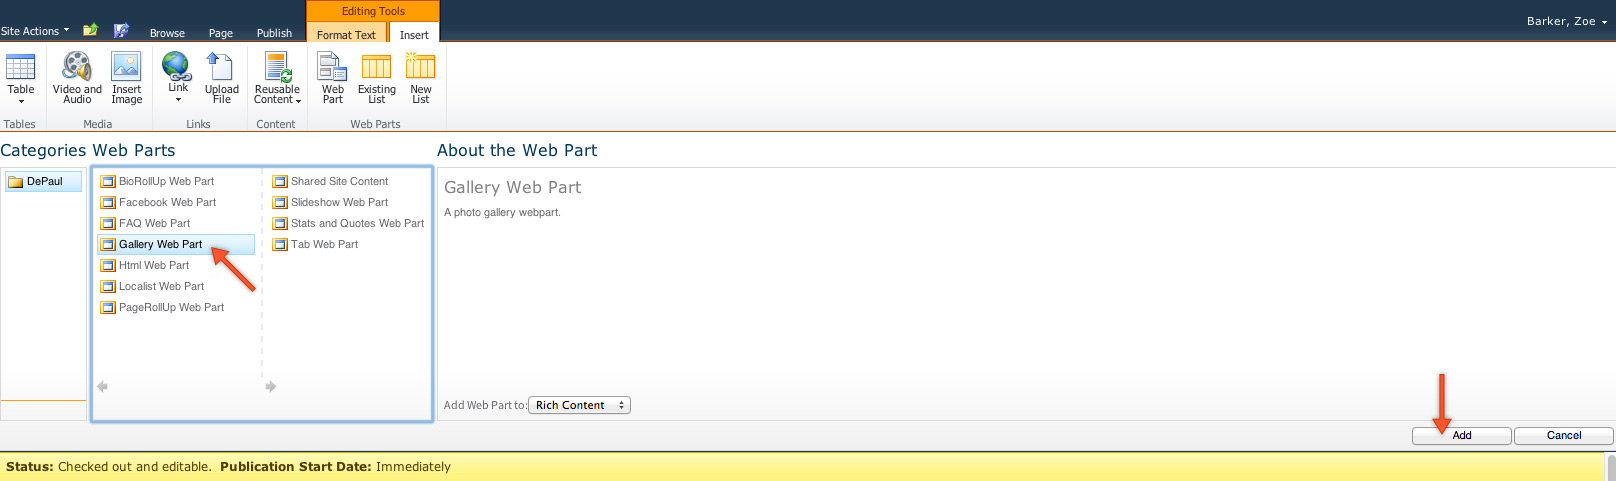
2. Select Gallery Web Part, and click Add.
3. Click on Configure Webpart and select Gallery Video and click OK.
4. Select Add New Item, and enter a Video Title (the Video Title will not be visible to the average viewer but is necessary for ADA standards). You don't have to add a caption.
5. Go to the tab you have open for YouTube or Vimeo and copy the video's URL. Paste the URL in the URL field. (do not use shortlinks, be sure to use the full video url — for YouTube it usually has the word "watch" in it).
6. Now we'll upload the screenshot you took (see paragraph above step 1). In the image filed, click Browse... Like you would when uploading any image, go to the correct Images folder by navigating the subsites of your site to the left in the window. Click Upload. Click Choose File and select the screenshot jpg you made and then click OK. Click the Check In button, then select the screenshot you uploaded and click OK.
7. Now in the Gallery Web Part window, you've filled in all the necessary fields, so you can click OK.
8. In the ribbon, click Save & Close and see how the video will look and make sure it plays. You may continue editing, or if you are pleased with it, click Check In in the ribbon. Submit for publishing when you are ready for it to be live to the world.
Before you leave a page, always Save & Close and Check In the page.
Step-by-step Image Guide
Click in the Main Content area, and in the ribbon select the Insert tab.

Click on Web Part.

Choose Gallery Web Part, and click Add.
Click Configure Webpart.
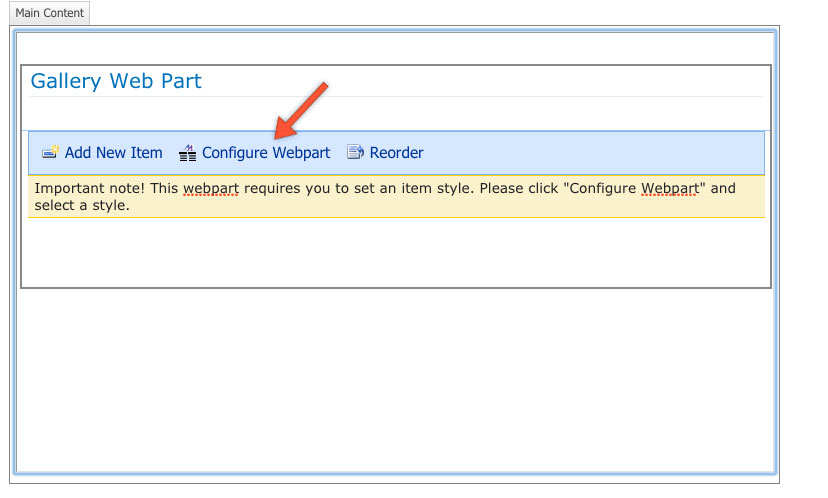
Select Gallery Video and then click OK.

Select Add New Item

The item window looks like this:

First, enter a Video Title. (the Video Title will not be visible to the average viewer but is necessary for ADA standards)
You don't have to add a caption.
Next, go to the browser window or tab you have open for YouTube or Vimeo and copy the video's URL. Paste the URL in the URL field. (do not use shortlinks, be sure to use the full video url — for YouTube it usually has the word "watch" in it).

Now that you've added the Title and URL, we'll upload the screenshot you took. In the image filed, click Browse...

Go to the correct Images folder by navigating the subsites of your site to the left in the window. Then click Upload.

As usual when uploading an image to SharePoint, click Choose File and select the screenshot jpg you made and then click OK. Click the Check In button, then select the screenshot you uploaded and click OK.

Now in the Gallery Web Part window, click OK

Your page is still in edit mode, so the web part will look like this:

In the ribbon, Save & Close to save the page and see how the video will look.

You may continue editing the page, or if you are pleased with it, click Check In in the ribbon. Submit for publishing when you are ready.