Once a set of groups has been created, the following changes can be made: changing the name of a category, adding groups or deleting groups from a category, and/or changing the name of individual groups in a category.
Unfortunately, how students are enrolled can not be changed. Instead a new set of groups should be created, and the old set should be deleted. See
Creating Groups for more information.
Change the Name of a Category
- Select
More from the course navigation bar.
- Select
Groups.
- Select the
category on the "View Categories" dropdown menu. (If there is only one category, it will be selected by default.)
- The category and a list of its groups is displayed. Select the
dropdown arrow next to the category name.
- Select
Edit Category.
- Change the name of the category in the "Category Name" field.
- Select Save.
Add a Group to a Category
- Go to the Groups area.
- Select the
category on the "View Categories" dropdown menu. (If there is only one category, it will be selected by default.)
- The category and a list of its groups is displayed. Select the
dropdown arrow next to the category name.
- Select
Add Group.
- The "Add Group" pop-up window will open.
- (Optional) Change the name of the group in the "Group Name" field.
- Select Save. The new group will appear in the list of groups within the category.
Delete a Category or a Group
- Go to the Groups area.
- Select the
category on the "View Categories" dropdown menu. (If there is only one category, it will be selected by default.)
- The category and a list of its groups will be displayed. Select the
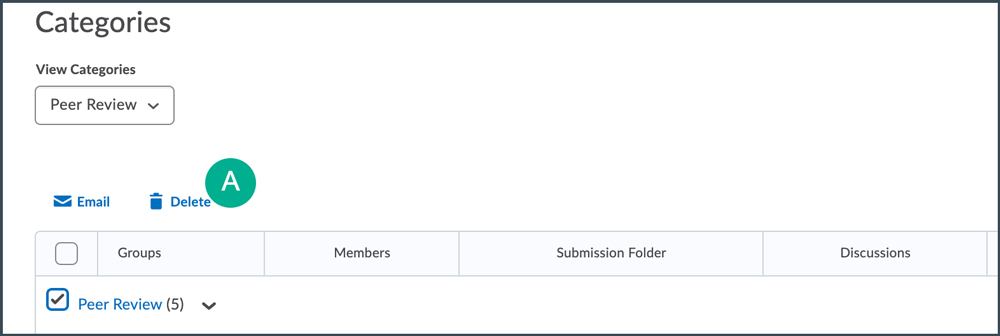
checkbox to the left of the name of the category or group to be deleted.
Note: If a category is deleted, all of its groups will also be deleted
- Select Delete [A].

- A confirmation dialog box will open. Select
Delete Groups/Categories. The dialog box will close, and the category and/or group will be deleted.
Change the Name of a Group
- Go to the Groups area.
- Select the
group category on the "View Categories" dropdown menu. (If there is only one category, it will be selected by default.)
- The category and a list of its groups is displayed. Select the
name of the group.
- The "Edit Group" page will open. Edit the group name in the "Group Name" field.
- Select Save at the bottom of the page. The new group name will appear in the list of groups within the category.
NEXT STEPS
After making changes to the groups, particularly if a new group has been added, make sure all of the students are enrolled in their respective groups. View
Adding Students to Groups for more information.