Zoom meetings can be recorded and saved to be shared after they occur. Hosts can choose to save a meeting to
Zoom cloud storage or
to their computer. All Zoom recordings will be saved for 120 days in the cloud.
Record to the Cloud
Recording a Zoom meeting to the cloud will save the meeting to Zoom’s cloud storage. This is the preferred option for sharing the recording because it allows users to access the recording through a link. The recording file can be downloaded to a computer or streamed from a browser. See
Adding a Zoom Link for instructions on sharing Zoom recordings.
- Create a Zoom meeting (See
Creating a Zoom Meeting for more details).
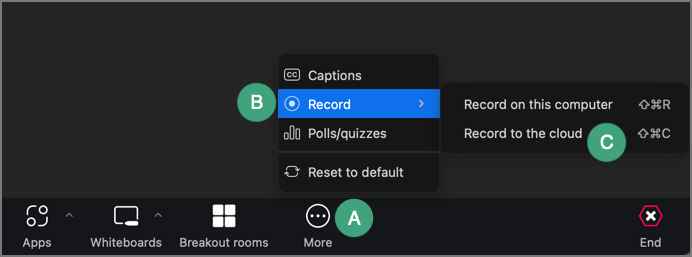
- At the beginning of the meeting, or whenever the recording should start, select
More [A].
- SelectRecord [B].
- Select
Record to the Cloud [C].

Note: Students do not have access to record to the cloud. However, they can record Zoom meetings using the directions for
Recording to a Computer.
- At any point during the meeting, recording can be paused by selecting the
Pause button [A] or stopped using the
Stop button [B].

- If the recording has not been stopped, it will stop when the host ends the meeting.
- An email will be sent once the recording has been uploaded to the cloud, providing a link for access.
Disable a Passcode for Existing Cloud Recordings
If a meeting has already been recorded to the cloud, by default it will be set with a passcode. Sharing the recording through Zoom as an
external learning tool will allow students in a course to view all recordings, so the passcode does not need to be disabled unless it is preferred.
Note: Class recordings should be shared via D2L for FERPA compliance.
- Navigate to
depaul.zoom.us.
- Select
Recordings from the menu.
- The “Cloud Recordings” page will open with a list of recorded meetings.
- Select the
Share button next to the recording to be made accessible.
- Select the
toggle next to “Password Protection” to turn this setting off.
- Select
Done.
Record to a Computer
When a Zoom meeting is saved locally to a computer, it will save in .mp4 format in a folder titled “Zoom” within the Documents folder on the computer. To share a recording that has been saved locally, the file will need to be uploaded to a course.
- Create a Zoom meeting (See
Creating a Zoom Meeting for more details).
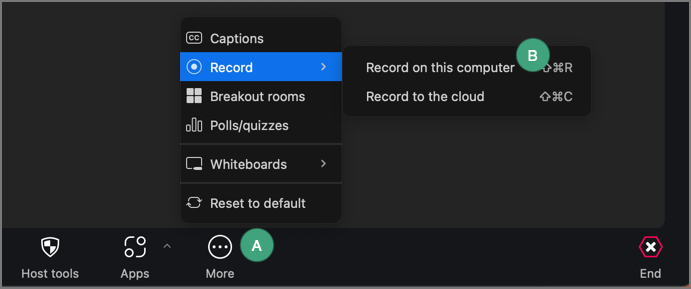
- At the beginning of the meeting, or whenever the recording should start, select
Record [A].
- Select
Record on this Computer [B].

- At any point during the meeting, recording can be paused by selecting the
Pause button [A] or stopped using the
Stop button [B].

- If the recording has not been stopped, it will stop when the host ends the meeting.
- When the meeting has been ended, a popup will appear with the .mp4 conversion progress for the recording. The recording will be available once this popup disappears.
Note: Recordings saved to a computer can also be accessed through depaul.zoom.us under “Recordings,” then “Local Recordings.”