Zoom accounts through DePaul provide AI-powered live transcription and closed captions. Live transcription only supports English and speaking as clearly as possible is recommended.
Captions will need to be enabled within a meeting before participants can
turn them on or use the
live transcription feature.
Enable Captions in a Meeting
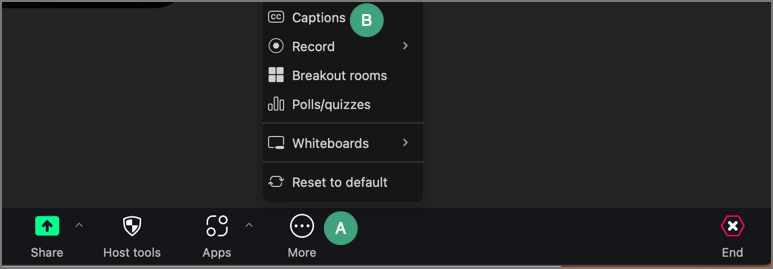
Before captions can be available to participants, the host will need to enable captioning within the meeting.
- From the toolbar, select More [A].
- Select Captions [B]. The "Show Captions" button will appear in the toolbar.

- Participants will now be able to turn on closed captions and/or live transcription by selecting
Show Captions in the toolbar.
Turn on Closed Captions
Once the host enables close captions, participants will need to turn them on.
- In the meeting toolbar, select
Show Captions.
- Confirm or choose the language in which the captions will appear.
- Select
Save.
- The subtitles will appear at the bottom of the Zoom window. They can also be dragged to other parts of the window.
Note: By default, subtitles are white text with a black background. These colors, along with other settings, can be modified. Select the caret next to Show Captions, then select
Caption Settings.
Turn off Closed Captions
When a user turns on closed captions, the captions will populate for all users in the Zoom meeting. Participants who do not want closed captions will need to manually turn them off.
- Within the meeting, select
Hide Captions.
- The captions will turn off only for the user who selected to hide them.
Use Live Transcription
Along with closed captions, Zoom offers a live transcription option.
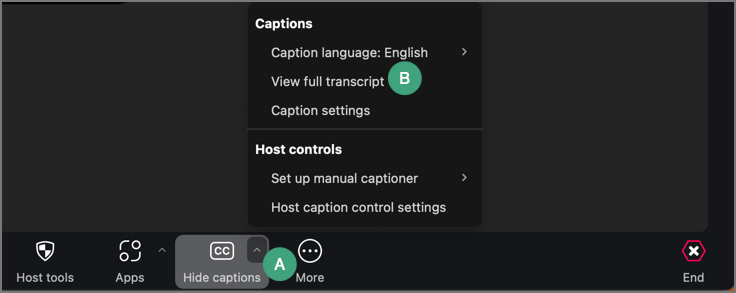
- In the meeting, select the
caret next to Hide Captions/Show Captions [A].
- Select
View Full Transcript [B].

- The transcript will appear next to the meeting window.
- (Optional) Remove subtitles by selecting
Hide Captions.
- Save the transcript as a .txt file by selecting
Save Transcript within the live transcript window.