When entering a course in D2L, a default Course Homepage will be displayed. Instructors can change the default by choosing from a list of pre-created Course Homepage options or by creating a new Course Home page.
Make a New Course Homepage Active
To change the Course Homepage, instructors can make a new one active.
To create and use a customizable Course Homepage, follow the instructions in the guide for
Creating a Course Homepage first. Then, activate it using the instructions below.
- Select Edit Course in the course navigation bar.
- Select Course Administration from the dropdown menu.
- Select Homepages under the Site Setup heading.
- Select the
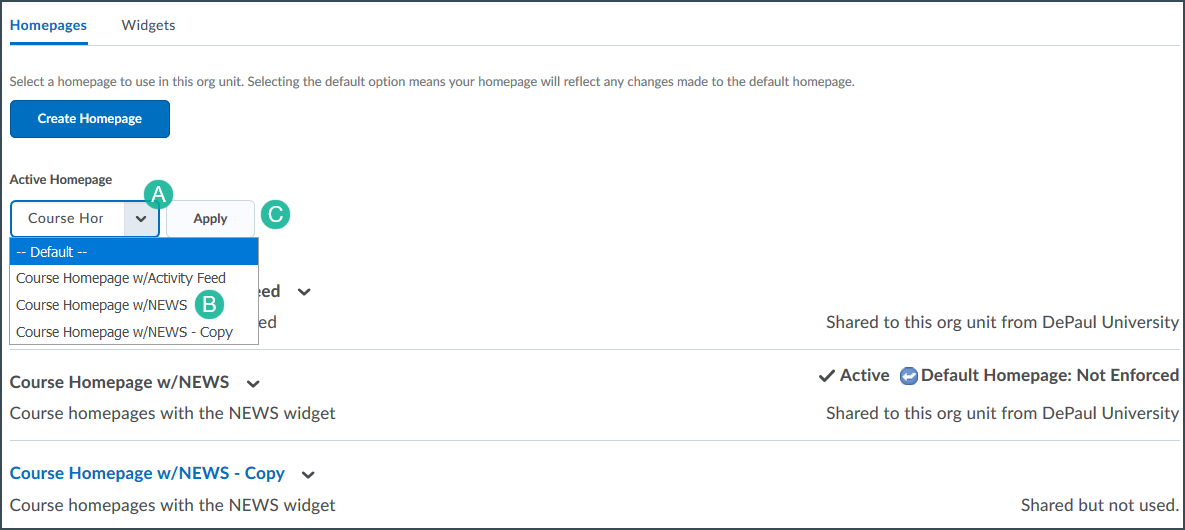
dropdown arrow [A] under “Active Homepage.”
- Select the
name of the homepage [B].
- Select the Apply button [C].
Create a Customizable Course Homepage
To create a customizable Course Homepage, instructors can make a copy of an existing homepage, then edit it before making it active.
- Select
Edit Course in the course navigation bar.
- Select
Course Administration from the dropdown menu.
- Select Homepages under the Site Setup heading.
- Select the
dropdown arrow [A] beside "Course Homepage w/NEWS."
- From the dropdown menu select
Copy [B].
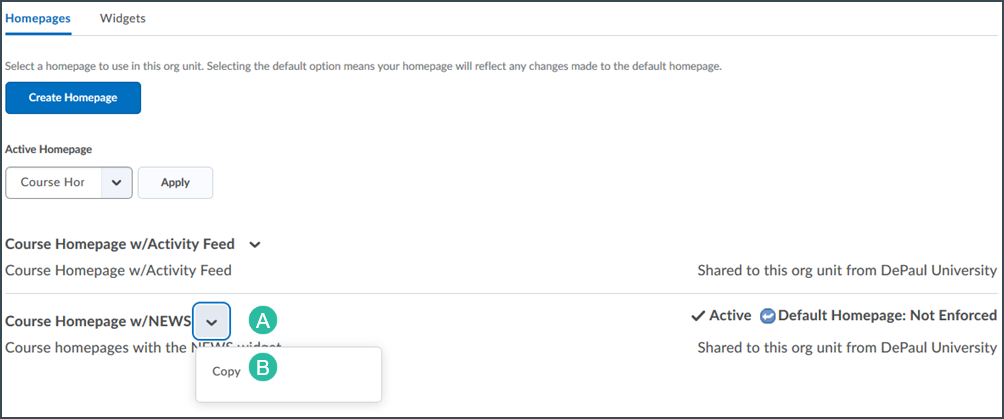
- A link to a new homepage called "Course Homepage w/NEWS - Copy" will appear. Select the link Course Homepage w/NEWS - Copy.
- Enter a name for the homepage.
- (Optional) Enter a description for the homepage.
- Select an option in the “Type” section:
-
Widget-based (default option): The homepage will display widgets. See the Optional Steps section below for information on Changing Widgets and setting up a Widget-based homepage.
-
Tool: The homepage will display a specific tool for the course, i.e., Content, Submissions, etc.
-
External URL: The homepage will display a page from an external website.
- (Optional) Include a homepage header such as the full name of the course. This will appear below the main navigation bar and above any selected widgets or other page content.
- Select Save and Close.
Once a new homepage has been created, instructors can add, delete, or move widgets that appear on the homepage. See the
widget index below for information on commonly-used widgets.
- Select Edit Course in the course navigation bar.
- Select Course Administration from the dropdown menu.
- Select Homepages under the Site Setup heading.
- Select the
title (link) of the homepage.
- Select the Change Layout button.
- In the pop-up window, select the
desired layout. Basic is the default option.
Note: Do not use the option "Three Equal Panels" as it does not work well on mobile devices.
- In the pop-up window, select the Update button.
- Add, remove, or move widgets:
-
To add Widgets: select Add Widgets in the section where widgets need to be added.
- A pop-up will appear. Select the
checkboxes next to the widgets.
- Select the Add button.
-
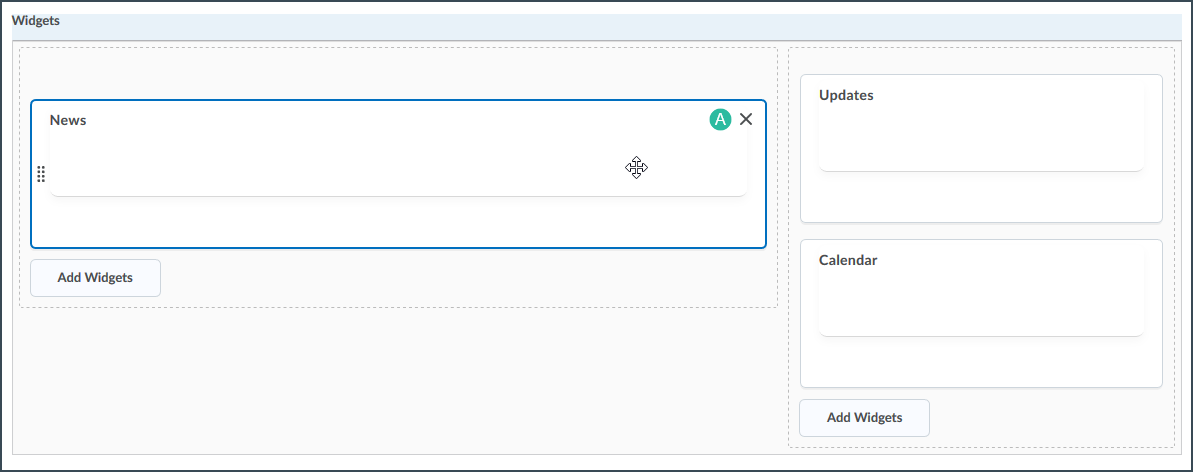
To remove a Widget: hover over the widget and Select the X [A] that appears.
-
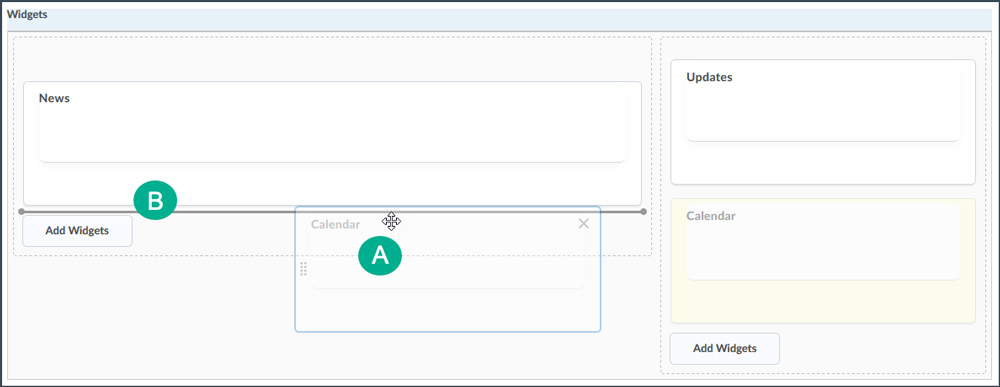
To move a Widget, select and hold the
widget [A] and then move the mouse to the desired location. A gray bar [B] will indicate the location to where the widget is being moved.
- Select
Save and Close when done making changes.
Customize the Profile Card Widget
The D2L Profile Card widget displays instructor information. When used on a Course Homepage, it must be modified.
There is a pre-created Course Homepage option with the Profile Card widget that can be
made active. The widget can also be added to a
new Course Homepage.
- From the Course Homepage, select the
dropdown arrow on the D2L Profile Card widget [A].
- Select
Configure this widget [B].
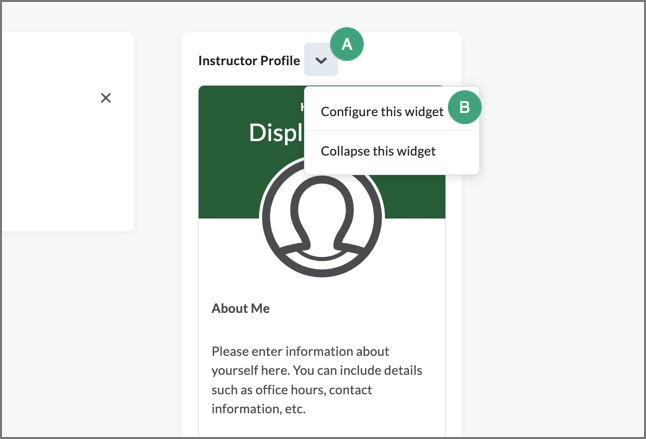
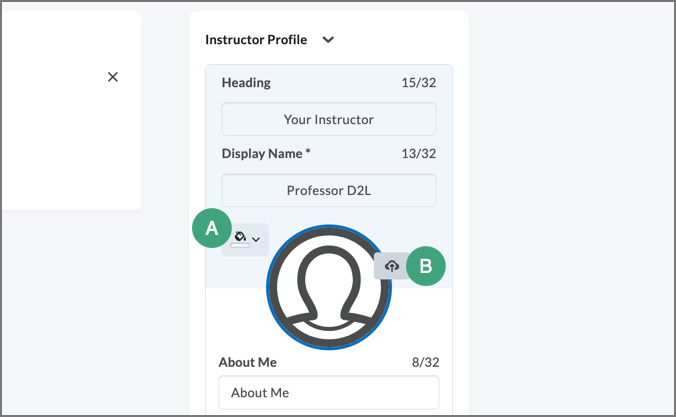
- The widget will refresh with customizable text boxes. Modify as needed. Fields that are left blank will not show when the widget is saved.
- To change the color of the widget, select the
paint bucket icon [A].
- To upload a profile photo, select the
cloud and arrow icon [B].
- When changes are complete, select
Save.
- A popup will open. Select
Yes to save changes.
Index of Widgets
The following list describes commonly-used widgets available to DePaul instructors. Widgets are listed in alphabetical order, and widgets included on a Course Homepage by default are indicated. Click on the widget title to read a description.
Activity Feed allows instructors to post messages (like reminders or additional readings) that are visible to the entire class. Instructors can change settings to allow students to also comment on posts. Activity Feed allows for attachments and web links. Additionally, posts can be pinned so they will remain at the top of the course homepage.
The Calendar widget consists of a mini-calendar and a list of upcoming events. It displays all events created by instructors, including Start, Due, and End dates attached to items in the course. Clicking on a day in the widget's mini-Calendar filters the event list to only display events for that day. Clicking on an event in the widget takes you to the event in the Calendar tool.
This widget is maintained by the DePaul Library. It contains links and information about citing sources in multiple styles.
The Content Browser widget enables users to browse course content, view recently visited topics, and view bookmarked topics from the course homepage. To view a topic, select its name to launch it in View Content. The Content Browser widget retains the place users left off when back on the course homepage. Unlike the Content Navigator, the Content Browser widget does not display content completion.
This widget allows users to access course content from the homepage. Content Navigator tracks and displays navigational history and completion and allows for navigation to the last-visited module topic. Icons are shown to indicate the content type. Completion of each module is indicated by a percentage.
Default images appear in this widget for each module. To change these images, insert an image within the description of a module.
The D2L Profile Card widget allows instructors to introduce themselves to learners. The widget provides an editable template that shows the instructor’s name and contact information as well as social media links.
The title of the widget and the instructor display name must be edited. The color of the widget and other text areas can also be modified.
The D2L Welcome widget introduces students to the course. This widget allows instructors to add a window overlaid on the course homepage. The window will pop up each time the user logs in and navigates to the homepage. Users will need to dismiss the window to clear it from the course homepage.
To populate content within this widget, a module with the title “Welcome” must be created in Content. The widget will pull the topics from that module and present them within the popup window. Users will click through the content as “steps” before they are able to dismiss the widget.
If ARES is used in the course, this widget will link users to the course reserves repository for the class.
The News widget allows instructors to post messages to the class. The default News widget optimizes course homepage space by providing a preview of multiple recent news items. This allows students to see new and relevant information quickly.
There is a default image that shows with the preview of a news item. This can be changed by adding an image to the news item; this image will then show with the preview. The best practice is to add the image at the bottom of the news item so students see the text first.
This widget provides students with links to information about navigating online courses. Information includes academic resources, technology requirements, expectations in class, and tips.
Add visual appeal to a course homepage by adding images to the Photo Bulletin. This widget is pre-populated with default images and a background, all of which can be removed and replaced.
The Updates widget shows instructors the number of unread Discussion Posts, the number of new assignment submissions, and the number of ungraded quiz attempts. These items appear as links that can be selected to be brought to the page corresponding to the unread/new items.
The Visual Table of Contents uses interactive flip tiles to add visual context to the course navigation experience. This widget automatically displays the module title and image from Content on the “front” of the tile and the module description on the other side. This allows students to quickly navigate to unvisited modules. Students can also view module progress and completion at a glance.
NEXT STEPS
For information on customizing the look and function of homepage widgets, as well as instructions for creating custom widgets, see Customizing Widgets.