The News tool in D2L allows instructors to communicate updates, changes, and new information to students. News items appear in the News widget on the Course Homepage, the first page that students see when they enter the course.
The default News widget displays slim previews of news items with images. To use a News widget that displays news items in full, use the
Old Style News widget.
Students can subscribe to News updates through email notifications, text message notifications, or an RSS feed.
Note: The News widget displays the first 200-250 characters of a News item, so keep this in mind when prioritizing where information is placed within the News item.
Create a News Item
Manage news items through the News widget on the Course Homepage.
-
From the Course Homepage, go to the News widget.
- Select
Create Announcement.
- Enter a title in the "Headline" field.
- Enter the text of the news item in the "Content" field.
Note: By default, the News widget will show a stock image with the preview of a news item, but this can be changed. To replace the default preview image, select the
camera icon and add an image. (See
Managing Images in a News Item for more information.)
- Set a date and time for the news item to display in the "Availability" section:
- Set the start date and time in the "Start Date" section.
- Uncheck the
Always show start date checkbox if students should not see the start date.
- Select
Remove news item based on end date and enter an end date to hide the news item from the student view after a certain date.
- To attach a file to the news item, select
Add a File under "Attachments" heading.
- Select
Publish when complete.
Edit a News Item
- Select the
headline of the news item.
- Select the
dropdown arrow next to the headline.
- Select
Edit.
- Make any necessary changes.
- Select
Update. The revised news item will then appear on the Course Homepage in the News widget.
Delete a News Item
Note: Selecting the X next to a news item will not delete it. This will only dismiss the news item, so it will still be available to users until the process below has been followed.
- Select the
headline of a news item.
- Select the
dropdown arrow next to the headline.
- Select
Delete.
- Select
Yes.
Copy a News Item
- Select
Show All Announcements within the News widget.
- Locate the news item to copy.
- Select the
dropdown arrow next to the headline of the news item.
- Select
Copy.
- The "Edit Item" page will open with the title of the news item marked as "Copy". Make any necessary changes to the title or body of the news item.
- (Optional) Modify the Start date.
- Select
Publish. The copied news item will then appear on the Course Homepage in the News widget.
Copy a News Item to Another Course
News items can be copied between courses. When copied, there is an option to automatically publish the news item.
Note: If copying a news item with internal links to a course site, the internal links will only work if the same linked items exist in the specified course.
- Select
Show All Announcements within the News widget.
- Locate the news item to copy.
- Select the
dropdown arrow next to the headline of the news item.
- Select
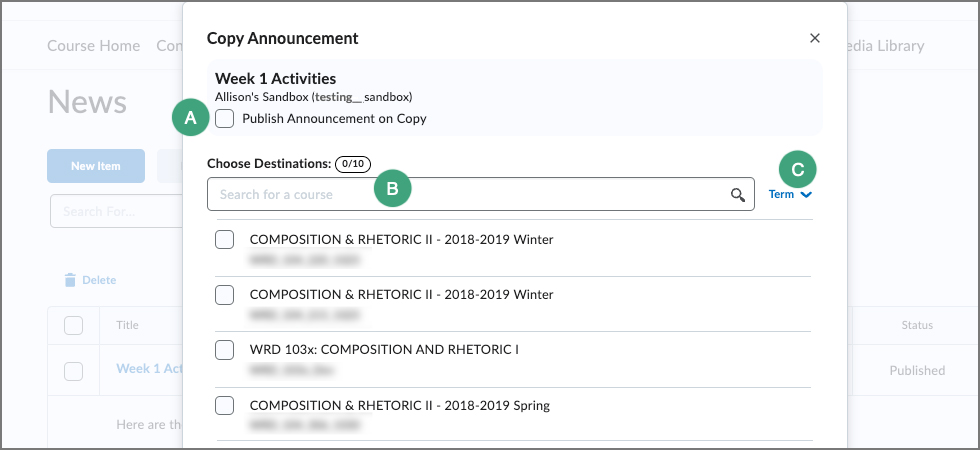
Copy to Other Courses. A popup window will open.
- (Optional) To immediately publish the news item when copied into the specified course, select the
box for "Publish Announcement on Copy" [A].
- Use the search bar to locate the course into which the news item should be copied [B].
- If needed, use the "Term" dropdown to filter the search by term [C].

- Select the
course.
- Select
Next.
- Select
Copy. Once finished, the copy will show as complete.
- Select
Done.
- (Optional) If the news item was not published during step 5, navigate to the course into which the news item was copied. The news item will show as a draft in the News widget and will need to be manually published.
Use the Old Style News Widget
To use a News widget that shows every news item in full, without the preview, the active Course Homepage will need to be changed. To only change the image displayed with the news item, see
Managing Images in News Items.
- Select
Edit Course in the course navigation bar.
- Select
Course Administration from the dropdown menu.
- Select
Homepages under the "Site Setup" heading.
- Select the
dropdown arrow under "Active Homepage".
- Select
Course Homepage w/ Old Style NEWS.
- Select
Apply.
NEXT STEPS
See
Managing Images in a News Item for information on replacing the default preview image and adding icons to news items.
For information on viewing and managing the content for the Calendar, see Viewing the Calendar and
Adding Calendar Events. To modify the display settings or visual appearance of the News widget, see
Managing Widgets.