Contact
CTL@depaul.edu for questions related to these settings or any other quiz setting that is not listed here.
Start, Due, and End Dates
Start, Due, and End Dates can be used to make a quiz available to students for a limited time. Students will be able to view information about the quiz, but will not be able to start taking it before the Start Date or after the End Date.
- A
Start Date indicates when the assignment is released to students. Prior to the Start Date, students will be able to see the quiz (unless it has been hidden), but they will not be able to access it. If a quiz is set up to be synchronous, the Start Date will indicate when the timer for the quiz begins.
- A
Due Date is the instructor-given date (and time) deadline for submitting a quiz. A student may submit after the Due Date (up until an End Date, if one is set), in which case it is marked late, in red, in both the instructor and the student view.
- An
End Date is more restrictive. It cuts off the quiz at the End Date and time set, where the student can no longer start a quiz.
Note: On quizzes that are
not set up to be synchronous, an End Date only restricts the ability to start the quiz, not to complete the quiz. For example, if a student starts a quiz that has a 60 minute time limit at 5 minutes before the End Date/time the student will still have 60 minutes to complete the quiz.
Modify Availability Dates
- Select the
quiz name.
- To add a Due Date, select the
text box under "Due Date" and choose a date and time.
- To add additional date restrictions, select the
Availability Dates & Conditions tab [A].
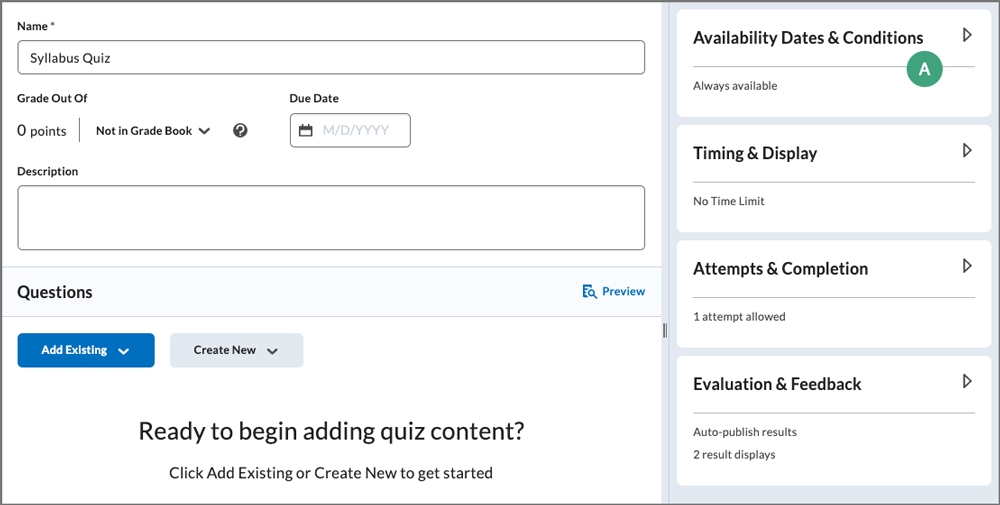
- Do any/all of the following:
- Select the Start Date box to set a Start Date for the quiz by entering or choosing the appropriate date and time.
- Select the
End Date box to set an End Date for the quiz quiz by entering or choosing the appropriate date and time.
- Select Add a Release Conditions to make this quiz only viewable after the students have met specified criteria.
- Select
Manage Special Access to provide select students with extended time or date restrictions.
- Select
Save and Close when the setting changes are complete.
Note: Due Dates for Quizzes can also be set in Content if the quiz is linked in a content module. See
Content for more information.
Set Time Limit and Late Submission Options for a Quiz
- Select the
quiz name.
- Select the
Timing & Display tab [A].
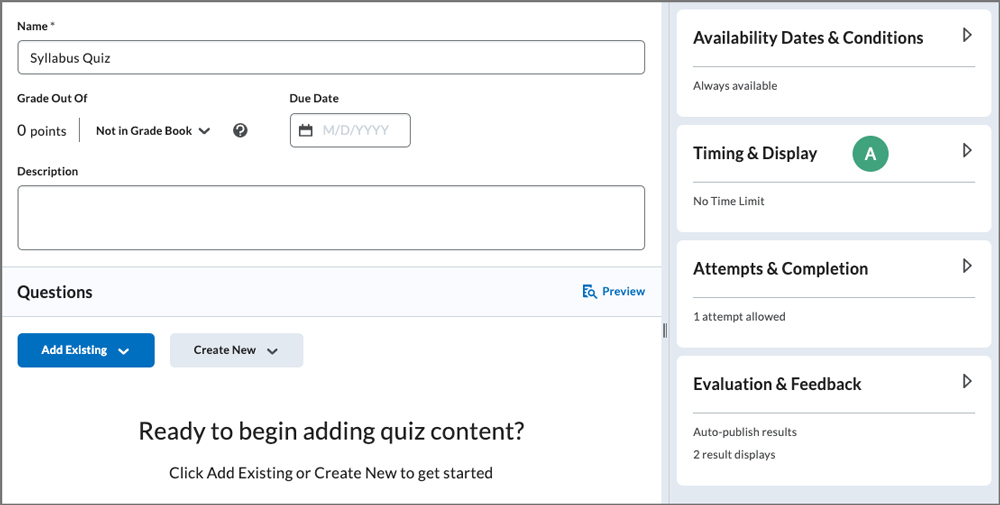
- Select
Set Time Limit.
- In the text box that appears, enter the number of minutes students are allowed to complete the quiz.
- By default, the quiz will be set to automatically submit the attempt when the time limit is done. To modify this, select
Timer Settings and choose from the options that appear:
-
Automatically submit the quiz attempt (default): This option will end the student's attempt and submit the quiz once the time limit is done.
-
Flag as "exceeded time limit" and allow the learner to continue working : This option will allow the student to continue working on the quiz once the time limit is done. Attempts will be flagged to show that the time limit was exceeded.
-
Do nothing: the time limit is not enforced: Choose this option if the time limit is just a recommendation. The time limit will not be enforced and attempts will not be flagged.
Note: If the quiz will have a time limit and will also be synchronous, see
Set Up a Synchronous Quiz.
- Select Save and Close.
Set Up a Synchronous Quiz
Note: Synchronous quizzes should not be given in courses delivered in an asynchronous modality.
If a quiz has a time limit, there is an option to make it synchronous. When a quiz is synchronous, its time limit begins at the specified Start Date. This means the Start Date determines when students can access the quiz and when the time limit begins.
Note: When a quiz is synchronous, its Start Date will not appear to students in the Course Calendar, the Work to Do widget, or the Pulse app.
It is recommended to add a link to the quiz in Content as this will push the Start Date to the Course Calendar. For instructions, see
Link to a Synchronous Quiz.
- Select the
Quiz name.
- Select the
Availability Dates & Conditions tab.
- Use the “Start Date” text box to set the time at which the quiz timer will begin.
- Select the
Timing & Display tab.
- Select
Set Time Limit.
- In the text box that appears, enter the number of minutes students are allowed to complete the quiz.
- Select
Timer Settings [A].
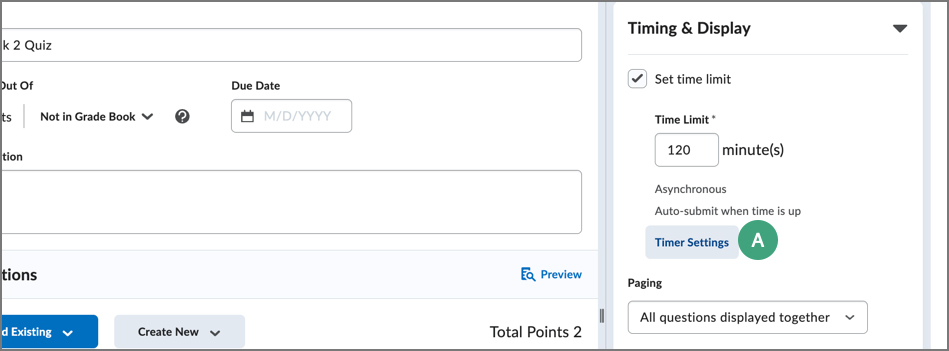
- Under “Quiz Start,” select the
radio button for “Synchronous: Timer starts on the start date.”
- Select
OK.
- Select
Save and Close.
Link to a Synchronous Quiz
When a quiz is synchronous, its start date will not appear to students in the Course Calendar, the Work to Do widget, or the Pulse app.
Adding a link to the quiz in Content will push the Start Date into the Course Calendar. Adding a Due Date is also recommended.
- Navigate to the Content module where the quiz will be placed.
- Select
Add Existing Activity.
- Select
Quizzes.
- Choose the quiz from the options.
- The quiz will appear within the module. Select the
downward-facing arrow next to the quiz.
- Select
Edit Properties In-Place.
- Select
Add Dates and Descriptions.
- Add a Due Date to the quiz using the Due Date text box. The Due Date should be the same as the Start Date.
- Select
Update to save.
- The Start/Due Date will appear in the Course calendar. (Optional) Drag the link to move its placement.
Change the Number of Times Students can Take a Quiz
By default, students are allowed one chance to take a quiz. Instructors may choose to allow students multiple attempts. If providing students with multiple attempts, instructors can also set the quiz to only show incorrectly answered questions on subsequent attempts.
Note: If multiple attempts are allowed and the quiz is associated with a grade item, the score to be transferred to the grade book will need to be specified.
- Select the
quiz name.
- Select the
Attempts & Completion tab [A].
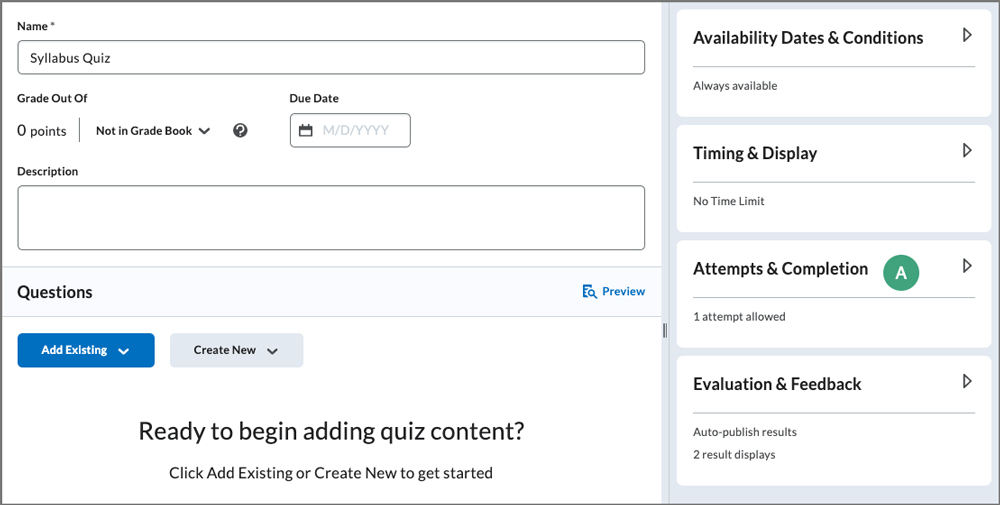
- Select
Manage Attempts.
- Choose an option for "Attempts Allowed."
- Choose an option in "Overall Grade Calculation" to specify how the quiz score will be calculated. (The default option is Highest Attempt, but there are several other options, including Average Score.)
- (Optional) Under "Retake Incorrect Questions Only" select the
checkbox so that on new attempts, students will only see the questions they previously answered incorrectly.
- Select
OK.
Display Questions and Feedback to Students
By default, students will not see feedback on individual questions on a quiz. An instructor can choose to adjust the view to include other elements like feedback, questions that the student answered incorrectly, questions the student answered correctly and/or the correct answers. It is also possible to add additional views that are available after a specific date.
Note: If date restricted submission views have been added to a course the instructor will want to be sure to revise the dates when the course is copied into a future term section as these views will be immediately visible to students as the dates will be in the past.
- Select the
quiz name.
- Select the Evaluation & Feedback tab [A].
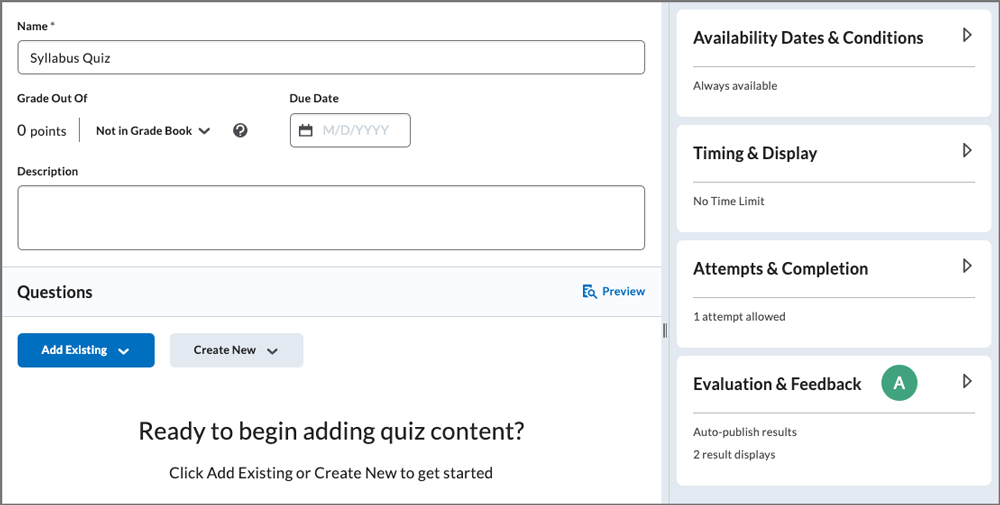
- Under "When published, display to learners" select the
dropdown menu to choose what will display to learners along with the attempt score.
Note: The box to display the attempt grade is selected by default. Keeping this selected will show students their numeric score once published.
- If further customization of the display is required, select Customize Quiz Results Displays.
- The page that opens will display the primary view and allow for edits or the creation of a new view. To create a date-restricted display view, select
Add Additional View and select the necessary settings along with the dates to restrict by.
Note: To limit the time questions and answers are displayed to students, create an Additional View that only displays the questions and/or answers for a limited amount of time after the student submits the quiz. To do this, create an additional view and select the date/time it should be released. Then, select the
check box to limit the time (in minutes) that the view should be available. It is recommended to make students aware of any time limit they will have to review questions and/or answers after submitting a quiz. For more detailed instructions, see
Creating an Additional View.
- When finished, select
Save and Close.
Set Respondus Lockdown Browser
Respondus Lockdown Browser is a tool that can be used to help prevent cheating when students are taking an exam in a proctored environment like a lab. It is not recommended for use in a non-proctored environment as it only affects the device the student is using to take the exam.
It is recommended to provide students the
instructions for downloading and installing LockDown Browser.
Note: For information about exam proctoring options, view the Exam Proctoring FAQ. To view this article, be sure to log in with Bluekey credentials.
- Select Quizzes.
- Select LockDown Browser [A].
- Select the
down arrow next to the quiz name [B].
- Select Settings [C].

- The "settings" page will open. Select Require Respondus LockDown Browser for this exam.
- (Optional) Set a password.
- Select any additional advanced settings.
- Select Save + Close.
NEXT STEPS
Once changes to the quiz settings have been changed, preview it to make sure everything is correct before students begin taking it. View Previewing Quizzes for more information.