When creating a new quiz in D2L, there are a number of steps to consider. See the following guides for information on completing each step:
For information on randomizing quiz questions to help prevent cheating, see both Using the Question Library and
Randomizing Quizzes.
Create a Quiz
- Select More on the course navigation bar.
- Select
Quizzes.
- Select New Quiz button.
- Enter a name for the quiz.
- Add questions to the quiz:
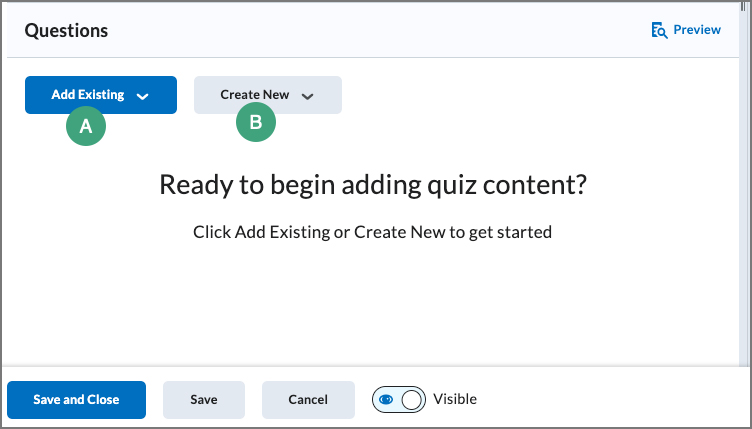
- Select Add Existing [A] to upload a question file or add questions from the Question Library to the quiz. (See Randomizing Quizzes for more information.)
- Select Create New [B] to see a list of options for adding new questions, creating a new question section, or creating a new question category. (See
Creating Quiz Questions for more information.)

- (Optional) Use the handlers to drag and re-order the questions.
-
Select
Save and Close when the quiz set-up has been completed. This might include
synchronizing the quiz with the grade book and/or completing some of the steps listed under
Next Steps below.
Activate a Quiz
By default, the status of a new quiz status is set to hidden and thus is not visible to students. This visibility must be changed before students will be able to see and take the assessment. When a quiz is hidden, an icon of an eye with a slash will appear next to the quiz name on the "Manage Quizzes" page.
Note: To add a link to a Quiz to a module in Content, follow the directions to
Add Links to Other Parts of the Course Site.
- Select the arrow next to the quiz to release a dropdown menu.
- Select
Make Visible to Users.
- The quiz is now active, and the Manage Quizzes page will be displayed. No eye icon will be displayed next to the quiz name.
Synchronize a Quiz with a Grade Item
Synchronizing a quiz with a grade item will connect the quiz to the grade book. Any questions on the quiz that can be automatically graded by the system will be scored. If the quiz is set to have scores published automatically, users will be able to see their score upon completion of the quiz attempt, and the score will be sent to the grade book. If the quiz has questions that will need to be manually evaluated, the quiz can instead be set to update scores in the grade book upon evaluation.
- From the Manage Quizzes page, select the
name of the quiz.
- On the page that opens, select
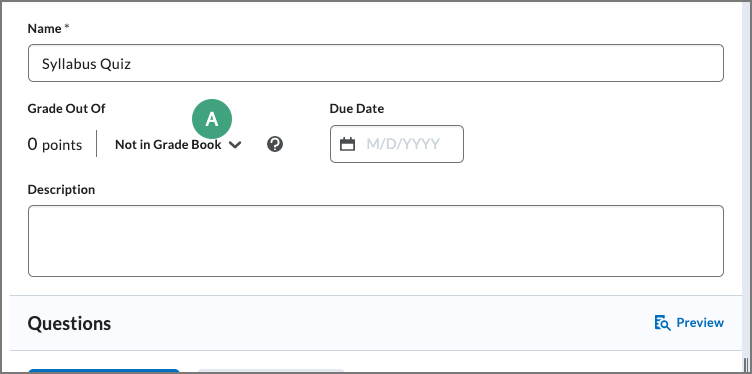
Not in Grade Book [A].

- Choose an option for linking the quiz to the grade book:
- Select
Edit or Link to Existing to link the quiz to an existing grade item. In the popup window that opens, select the
radio button to "Link to an Existing grade item." Choose the grade item from the dropdown list, then select
OK.
- Select
Add to Grade Book to add a grade item with the same name as the quiz to the grade book. To make changes to this grade item, use the Grades area. (See the guide for
Creating a Grade Item.)
- By default, quiz scores are published automatically to students. To change this, select the
box to "Auto-publish attempt results immediately upon completion".
Note: If there are questions on the quiz that cannot be auto-graded by the system, they will be scored at 0 until manually evaluated. See
Creating Quiz Questions for details on which types can be graded automatically.
- To synchronized the quiz score with the grade item, select the
box to "Synchronize to grade book on publish".
- Select
Save and Close.
Delete a Quiz
- Navigate to the Quizzes area.
- Select the
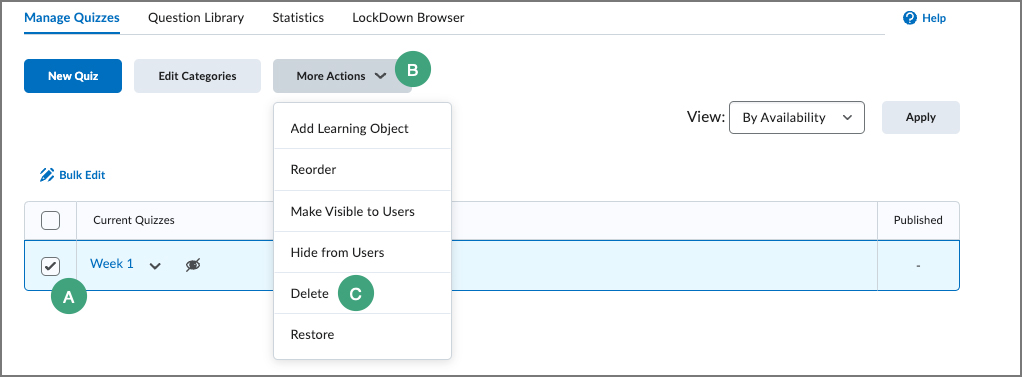
checkbox next to the quiz to be deleted [A].
- Select
More Actions [B].
- Select
Delete [C].

- A confirmation popup will appear. Select
Delete to confirm.
Restore a Deleted Quiz
A quiz deleted within a course can be restored using the "More Actions" menu.
- Navigate to the Quizzes area.
- Select
More Actions.
- Select
Restore.
- A new page will open with a list of deleted quizzes from the course. Locate the quiz to be restored.
- Under the "Actions" column, select
Restore.
- Navigate back to the Quizzes area to see the restored quiz.
NEXT STEPS
Learn about Changing Quiz Settings, how to Grade Quizzes,
Granting Special Access to Quizzes, and
Solving Quiz Submission Issues.