Instructors can set date restrictions for deadlines and availability on modules or topics in Content to indicate when students can access materials or when assignments are due. Instructors can also hide items so they are present in the course but not accessible to students:
There are 3 types of dates in D2L:
-
Start Dates modify when a student can view or access content in a module or topic. Students will see that a module or topic exists, but they cannot access it if the Start Date has not yet occurred.
-
Due Dates specify when a student should complete materials in a module. The dates will appear in the course Calendar and students will be able to see and access materials with a Due Date after the date has passed.
Note: Due Dates are not recommended for entire Content modules because they will appear for students in the Work to Do widget and cannot be removed from the student view.
-
End Dates restrict access to modules, topics, or items. They remove all access once the date has passed.
Note: End Dates are not recommended for Content modules or topics because they end student access to those materials.
Set Dates for a Module
Dates for a Content module specify when a module is available for access, will become unavailable from access, or when its expected completion is due. Any dates set will be displayed beneath the module title, and the module name and set date(s) will also display on the Calendar widget on the Course Homepage.
Note: Due Dates are not recommended for entire Content modules because they will appear for students in the Work to Do widget and cannot be removed from the student view.
Setting Start Dates and End Dates at the module level controls the access of not only the module, but also all of the topics within that module.
- Go to the Content.
- Navigate to the desired module.
- Select "Add dates and restrictions… " to display settings options.
- Choose the desired type of date to apply (Start Date, Due Date, and End Date) by selecting the respective text: "Add start date...", "Add due date...", or "Add end date...".
- Enter the time and date restriction desired by either using the calendar and dropdown selectors, or by entering text. For any date type, both a date and a time are required.
- Select the
Update button to apply the selected date restrictions. Any dates set will be displayed below their respective module title in the Table of Contents. If a module is selected, all set dates will be displayed beneath the module title on the page.
Set Dates for a Topic
- Select the
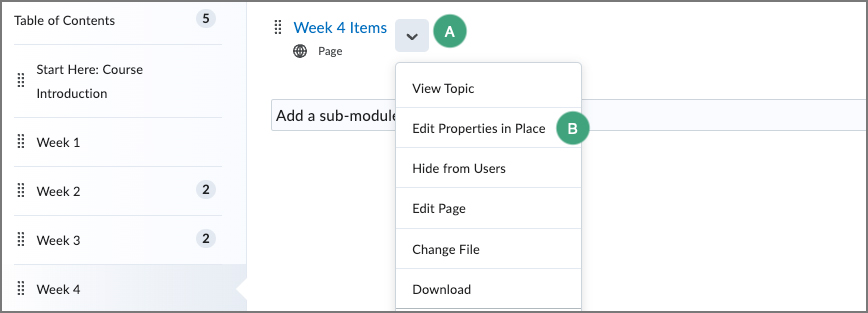
dropdown arrow [A] next to the topic title to reveal its settings options.
- Select Edit Properties In-place [B].

- The topic properties will expand below the topic title. Select "Add dates and restrictions…"
- Several settings options will be displayed. Select the date restriction option to be set: "Add start date...", "Add due date...", or "Add end date...".
- Date and time options will expand below the item title. Enter the desired time and date by either using the selectors or by entering text.
Both a date and a time are required in order to apply the setting.
- Select the
Update button to apply the date restrictions: the date will be displayed below the topic title.
Note: To reset or remove a date and time set on either a module or a topic, simply select the date setting to expand the date options. From the date options, either select a new date restriction, or select
X next to the date and time options to remove the date setting completely. Select the
Update button to apply changes.
Modify Module Visibility
When creating a module, the default setting is Visible. To hide a module from student view, set its status to Hidden. This will conceal the module and make all of its topics completely invisible to students. This setting can easily be reversed to make the module Visible again.
- Select the
module to be set to Hidden.
- Select the
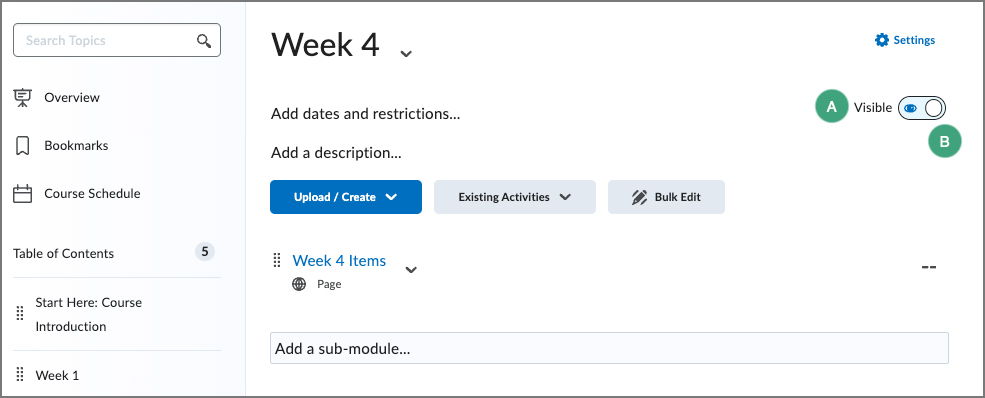
eye icon [A]to reveal the toggle.
- Select the
toggle [B] to change the module to Hidden. The eye icon will be slashed to illustrate that it is Hidden.

- To set a module to Visible, select the
eye icon.
- Select the
toggle to change the module to Visible. The eye icon will no longer be slashed, indicating visibility to students.
Hide a Topic from Student View
When a topic is added to a module in Content, it inherits the visibility of the module by default. Within a module, individual topics can be set to Hidden, so they will not appear to students.
- Select the
Bulk Edit to open visibility options for all topics in a module [A].

- Locate the topic to be set to Hidden.
- Select the
eye icon to reveal the toggle.
- Select the
toggle to change the topic to Hidden.
- Select
Done Editing to save changes.
NEXT STEPS
To reorganize modules and topics within the Content area in a course, view Reordering Modules and Topics.