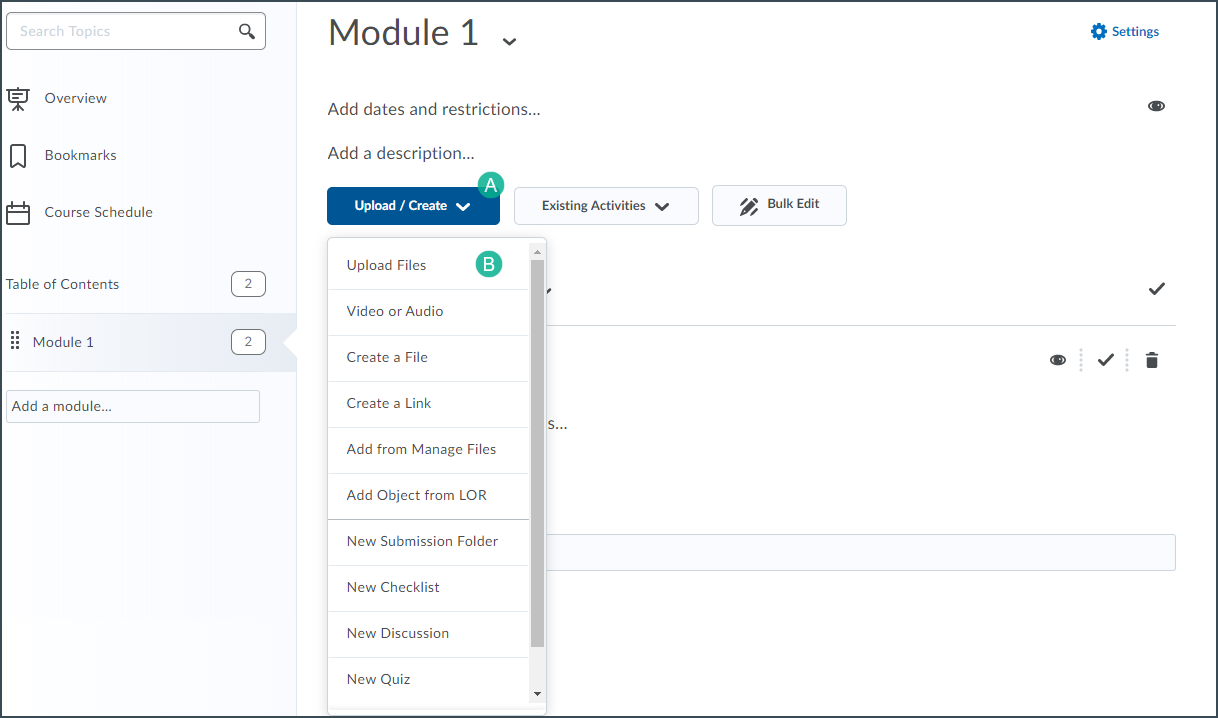
Files uploaded to Content can be viewed and downloaded by users. Instructors can upload files in the following ways:
Upload Files from a Computer
D2L allows the upload of common file types such as PDF, DOC, DOCX, PPT, and PPTX. These files are displayed within a document viewer in the Content area.
A module must be created first before files can be added. See
Creating a Module for instructions.
- Go to a module in Content.
- Select the Upload/Create [A] button.
- Select
Upload Files [B] from the dropdown menu.

- The Add a File pop-up window will open. Select the Upload button to locate the file or drag the file from the computer desktop and drop it within the dotted box.
- Select the
Add button.
Note: It is possible to select more than one file at a time in step 3. This will save time if uploading multiple files at once.
Upload Files from Google Drive
Files can be uploaded from Google Drive directly into a module. A Gmail account is required. Any changes made to the document in Google are pushed instantaneously to the live version in the course.
- Go to a module in content.
- Select the Existing Activities button.
- Select Google Drive from the dropdown menu. Google will require login information to be entered if this is the first time using Google Drive in D2L.
- From the Add Activity window, select the
file to be inserted. Multiple files can be selected at once by holding down the shift key while choosing.
Note: If the file is not publicly viewable, a notification saying "This file is private" will appear. Next to this, a checkbox will say "Change permissions so that anyone with a link can view." If this box is unchecked, students will not be able to view the file.
- Choose Select.
- The file is now embedded in the module.
Note: If the file is set to "Anyone with the link can view," students will only be able to view the document. If it is set to "Anyone with the link can edit," students will be able to make changes to the document (e.g. a sign-up sheet).
Upload Files from Microsoft OneDrive
Files can be uploaded from Microsoft OneDrive directly into a module. This will create a live link to the Microsoft Web version. Any changes made to the document in Microsoft are pushed instantaneously to the live link in the course. A Microsoft account is required to use OneDrive, so a DePaul email address can be used.
Note: To link to a file in OneDrive, instructors must be the original owner of the file. If the file was downloaded from elsewhere or shared with the instructor, OneDrive will link to the entire folder in which the file is stored (sharing permissions as set on the folder will still apply).
- Go to the module in content.
- Select the Existing Activities button, then
- Select OneDrive from the dropdown menu. Microsoft will require login information to be entered in order to allow access from D2L.
- From the Add Activity window, select the file that needs to be inserted.
- Choose Select.
- The file is now linked in the module.
Note: By default, files are set to "Read Only."
NEXT STEPS
View Reordering Modules and Topics for more information on how to reorganize files.