Users can record videos with Panopto in two ways:
Panopto maintains detailed instructions for recording; see
How to Record with Panopto for Windows and
How to Record with Panopto for Mac from Panopto for more detailed recording and screencasting instructions.
See also
Home Lecture Recording Tips for more information on recording lectures.
Record with Panopto Capture
To record or screencast within a browser, use the Capture option.
Note: Mac users will need to provide additional permissions for Capture to record the screen. See the guide from Panopto for details.
- Navigate to the course where the screencast or recorded video will be uploaded.
- Launch Panopto Capture using the instructions found on
Launching Panopto.
- Once launched, modify any settings:
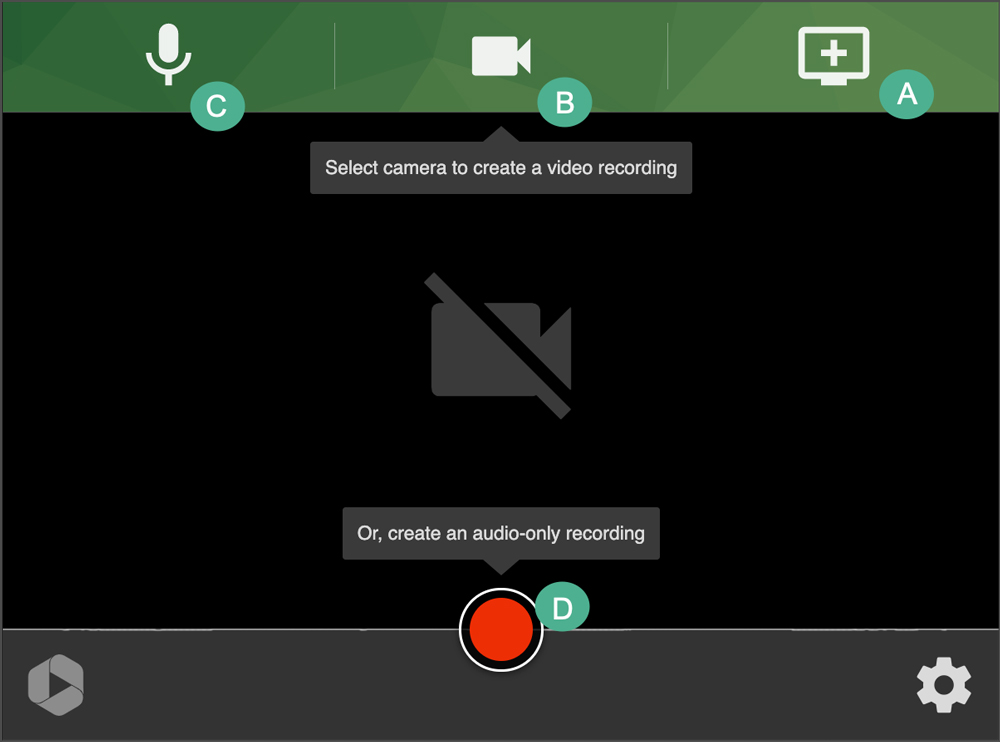
- Select the
monitor icon to add a secondary source [A].
- Select the
camera icon to uncheck the video option and create an audio-only recording [B].
- Select the
microphone icon to uncheck the microphone option and create a video-only recording [C].
- Proceed to record by selecting the
record button [D].

- When finished, select the
Stop button [A].

- The recording will process and indicate when the browser can be closed or the video can be edited.
- Enter a title for the video. The default title is the date of the recording.
- (Optional) Enter a description for the video.
- Once Capture is closed, the recording will appear in the course Panopto folder.
Use Panopto Capture to Focus Video Streams
By default, Panopto Capture records the camera input and any additional video inputs as separate streams, it and displays them as picture-in-picture. Removing the camera input will leave an empty box in the recording. To avoid this empty box and maneuver between video streams, additional steps must be taken.
- Navigate to Panopto Capture.
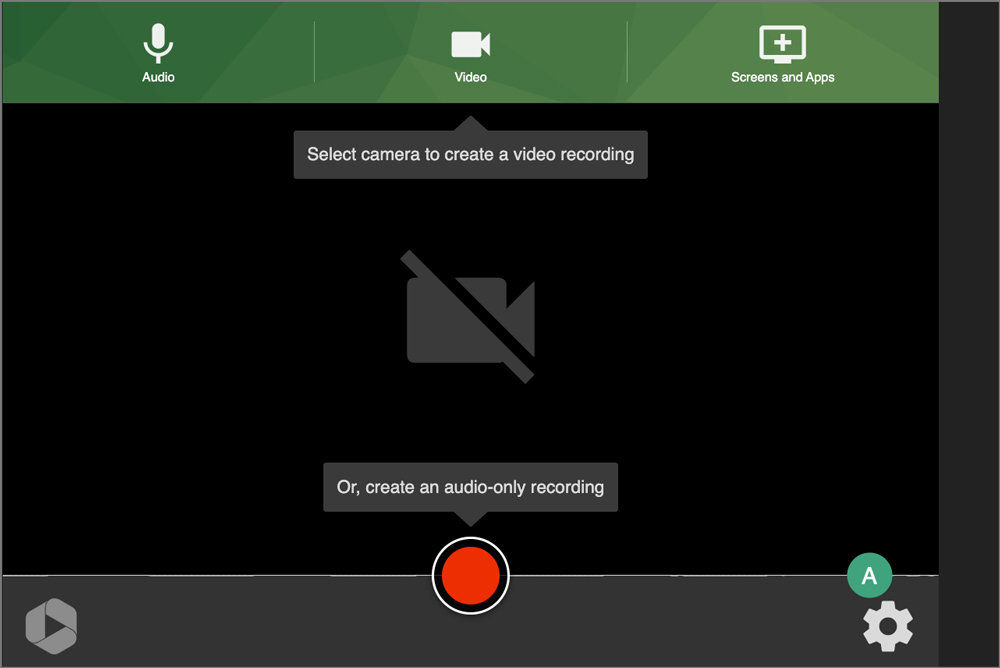
- Before recording, select the
gear icon to manage settings [A].

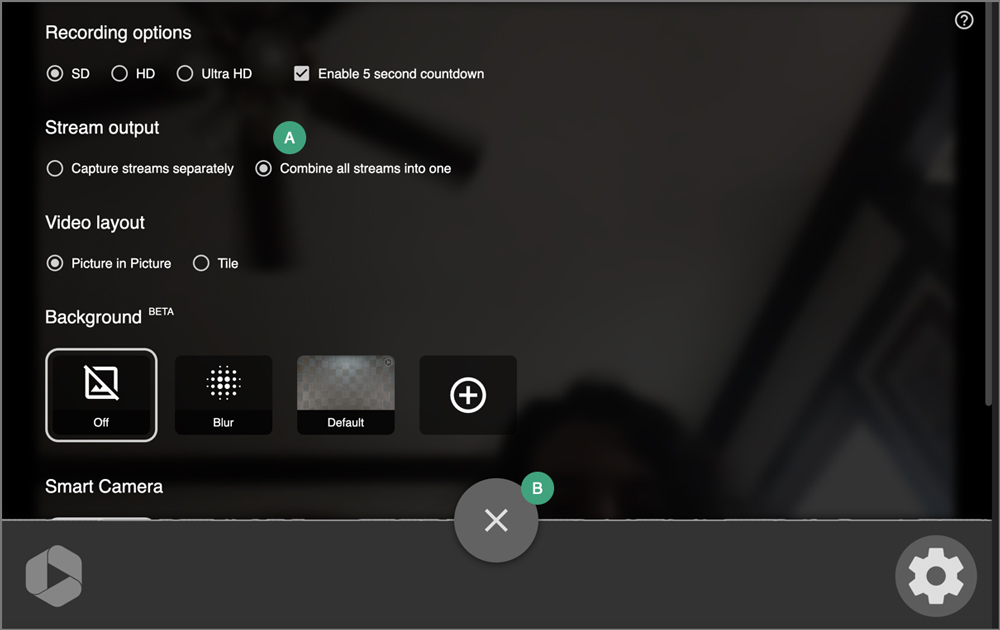
- Select the
radio button to “Combine all streams into one” [A].
- Select the
X to close the settings menu [B].

- Choose the appropriate camera input and any additional inputs (see
the directions for using Panopto Capture).
- Begin recording.
- To eliminate the camera input and focus on an additional input, select the
X next to the camera input.
- Navigate to the additional input and continue as needed.
- When finished focusing on the additional input, navigate back to the Panopto Capture window.
- To add a camera stream back, select the
camera icon and choose the input.
- Finish recording as needed.
Record with the Panopto Recorder
To record or screencast using the Panopto Recorder, first be sure that it has been downloaded using the instructions for
Downloading the Panopto Recorder.
- Navigate to the course where the screencast or recorded video will be uploaded.
- Launch the Panopto Recorder using the instructions for
Launching Panopto.
- Once launched, make sure that the correct course is listed. If not, select
Browse from the side menu and then choose the correct course from the list.
- Next, select the settings for the screencast or recorded video:
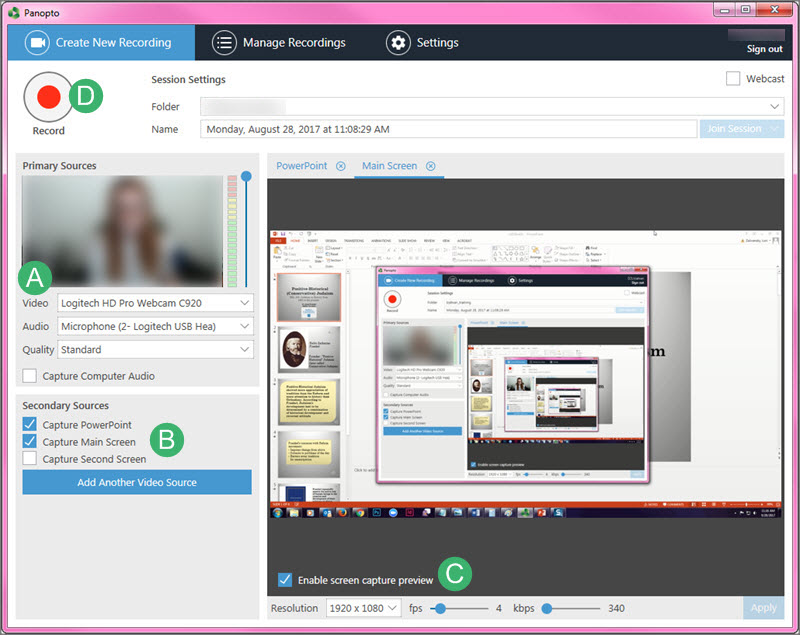
- Primary Source Settings [A]:
- For a video lecture where students will see the instructor, make sure that the webcam is connected and listed under the
Video source. An
Audio source will also need to be selected. Note that the main screen and/or a PowerPoint will need to be in the Secondary Source Settings for this option to work.
- For a video lecture where only the voice is recorded, the
Video source can be changed to “None” but an
Audio source will need to be chosen or the recording will not work.
- To record and include the audio played by the computer (such as clicks), select the “Capture Computer Audio”
box.
- Secondary Source Settings [B]:
-
Capture PowerPoint: If using a PowerPoint, Panopto can automatically start the slideshow when
Record is selected, eliminating some of the fumbling of switching windows when recording starts. This setting also allows Panopto to list the headings of each slide, which are indexed for search purposes.
-
Capture Main Screen: This will allow Panopto to record a screencast of what is seen on the device screen. It will record whatever appears on the screen, even if windows or views are switched.
-
Capture Second Screen: This option will only appear if there is a second monitor set up on the device. If so, that screen can be set to be recorded in the same way that the main screen is recorded.
-
Add Another Video Source: If other video source options are available, they will appear here.
- Screen capture preview: For a preview what the video would look like with the current settings, select the
box to “Enable Screen Capture Preview” [C].
- Once satisfied with the settings, proceed with recording by selecting
Record [D].

- When recording is finished, re-open Panopto (it is minimized while recording is in progress), and select
Stop [A].

- Enter a title for the video in the "Session Name" field. By default, Panopto titles the video with the date and time of the recording. A short description can also be added.
- Once the video has finished uploading and processing, instructors can view or edit the video from the course page in Panopto. See
Editing Panopto Videos for instructions.
NEXT STEPS
Learn how to improve visual quality of videos using
Home Lecture Recording Tips. Also refer to
Editing Videos for information on trimming and editing recordings.