The navigation bar, or navbar, is the set of links that appears across the top of the course site. When the course site is created, the default DePaul navbar will be active. Instructors may wish to create a custom navbar to give students access to other course tools. Navbars can be customized with internal links to parts of the course site and links to external websites. Links can be added individually or as a link group. Once added, links can be reordered as well as deleted.
Once created, a navbar must be set as active before it will show within the course.
Note: It is strongly recommended that new navbars be created by copying the default navbar rather than creating a new navbar from scratch. In addition, the Course Home and Edit Course links should remain on the navbar for easy access to key parts of the D2L site.
Create a New Navbar
- Select
Edit Course.
- Select Course Administration.
- Select
Navigation & Themes.
- The Navbar page will open. It displays a list of the navbars that are currently available for use.
Note: If the Course Administration page is set to show tools by
category (the default), Navigation & Themes will be under the heading "Site Setup". If the Course Administration page is set to view by name, then Navigation & Themes will be listed alphabetically.
- Select the
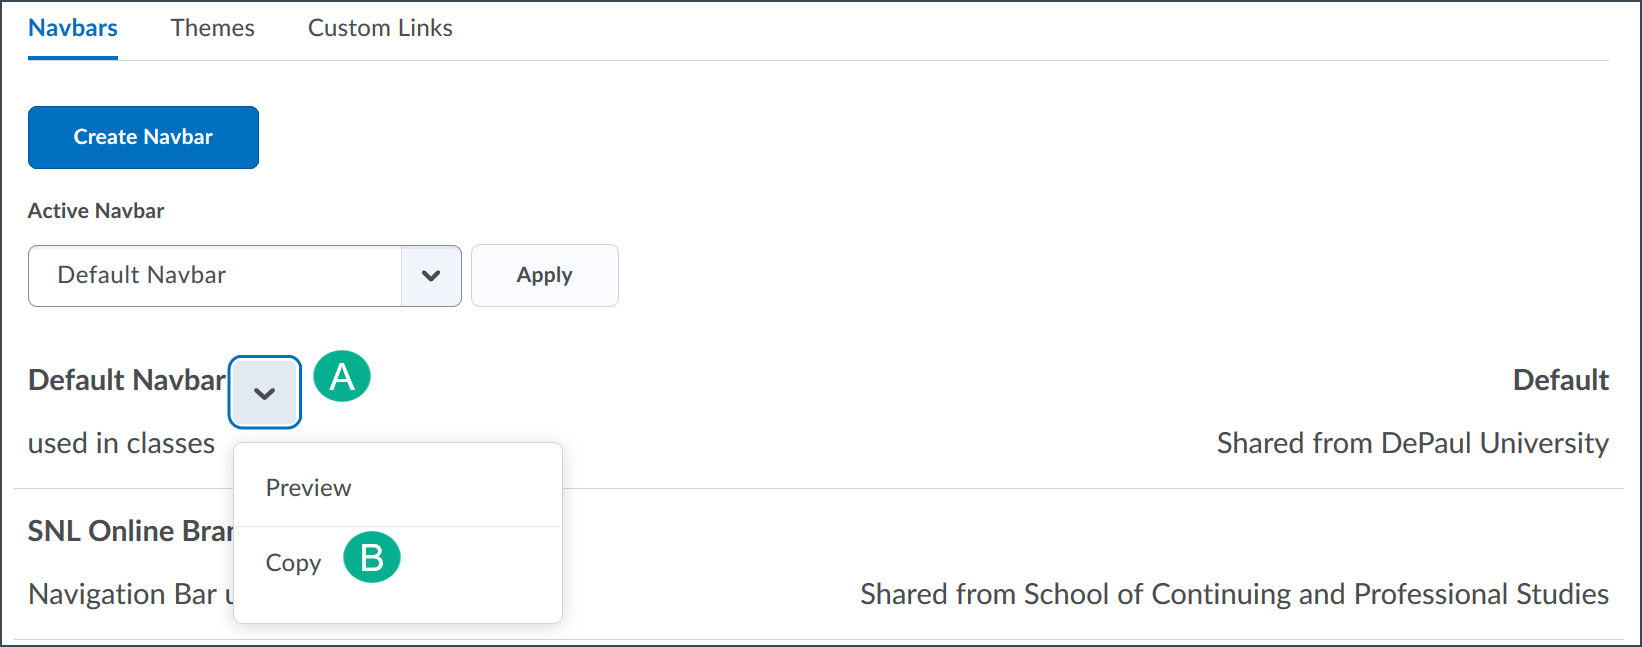
drop-down arrow next to the Default Navbar [A].
- Select
Copy [B].

- A new navbar titled "Default Navbar - Copy" will now appear in the navbar list.
- Select Default Navbar - Copy to edit.
- Enter a new navbar name.
- (Optional) Enter a description for the navbar.
Note: Students do not see the navbar name or description. They are only for instructor reference.
- (Optional) Select
Change Theme to select a new layout for the course navigation. The "DePaul University – Course Default" option is selected by default.
- Add, remove, or reorder the links that will appear in the new navbar
using the instructions below.
- Select
Save and Close when finished.
Note: The new navbar will not appear at the top of the course site until the navbar is active. See instructions for
Activating the Navbar to complete this step.
Add Internal Links to the Navbar
Links to system tools, such as Groups, Surveys, Self-assessments, Quizzes, etc. can be added to the course navbar.
Note: Adding a link to a tool normally in the More "link group" to the navbar will not remove it from the More link group. Removing it from this "link group" will require the creation of a new "link group" that does not include the link.
- Select
Add Links .
- Select the box(es) for the tool(s) to be added to the navbar.
- Select Add.
- The window will close, and the tools selected will be displayed in the Links area.
Delete Links in the Navbar
Note: Do not remove the Edit Course link from the navbar. Students will not see it, and it must be in the navbar to access course settings.
- Hold the cursor over the link to be deleted until “X” appears.
- Select X.
- The link will be removed from the navbar.
Reorder Links in the Navbar
- Hold the cursor over the link to be reordered until the three-line symbol appears on the left side of the link.
- The cursor will turn into the crosshair symbol. Hold down the left mouse button to select the link.
- Drag the link to its new location.
- A gray bar will appear that indicates where the link will be placed when dropped. Release the mouse button to drop the link in its new location.
Add Custom Links to the Navbar
Custom links can be created and added to the course navbar. Custom links can link to specific items in the course or external websites.
- Select
Add Links.
- Select
Create Custom Link
- Enter a name for the link in the name field. This name will be the label for the link in the navbar.
- Enter location information for the custom link.
- To link to an external website, copy the web address and paste it into the URL field.
- To link to a specific item within the course, select Insert Quicklink. A list of course areas will open. Select the specific area in which the item is located, then select the item
to link.
Add a Link Group to the Navbar
A link group will display as a title and drop-down arrow in the navbar. When students click on the link, a drop-down menu will open that displays all of the links that were added to the group. (The
More drop-down menu that appears in the default navbar is an example of a link group.)
- Select
Edit Course.
- Select Course Administration.
- Select
Navigation & Themes.
- The Navbars tab will open. Select the
Custom Links tab.
- Select
Create Link Group.
- Enter a name for the link group. This is the text that will appear with the drop-down arrow in the navbar.
- Add the link(s) that will appear in link group drop-down menu:
- Select
Add Existing Link to select an area in the course.
- Select
Create Link to create a custom link to an item in the course or to an external page.
- Repeat step 4 until all links have been added to the group.
- Select
Save.
Note: To find the custom link group quickly, Select Custom Groups at the top of the Add Links window.
Set the New Navbar as Active
When all edits have been completed, the navbar must be set as active in the main Navbars page before students will see it in the course.
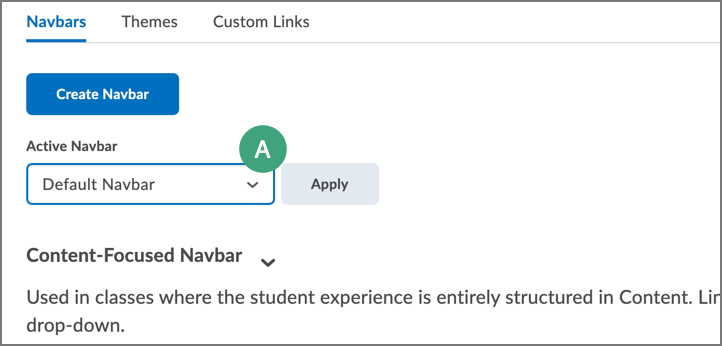
- Select the drop-down arrow to open the
Active Navbar menu [A].

- A list of all of available navbars will be displayed. Select the navbar to be made active.
- Select
Apply.
Note: After setting the navbar as active, any changes made to the navbar will be immediately visible to students.