Rubrics contain criteria that list the attributes on which an assignment will be assessed and levels that list the standards each criterion must meet. A specific grade or score is usually assigned to each level.
Once a rubric is created, there are a number of ways it can be used:
Instructors can also modify rubrics:
For more information on designing rubrics, visit the
Rubrics teaching guide.
Create a New Rubric
When creating a new rubric, the system auto-saves, so there is no Save button.
- Select Edit Course in the course navigation bar.
- Select
Course Administration from the dropdown menu.
- Select
Rubrics under the Assessment heading.
- Select New Rubric.
- Enter a name for the rubric.
- Select a Rubric type from the dropdown menu.
-
Analytic (default option): Multiple criterion rubrics that assess granular achievement on an activity. This is the recommended option.
-
Holistic: Single criterion rubrics that assess overall achievement on an activity.
- Select a Scoring method from the dropdown menu.
-
Points (default option): The rubric will calculate a numeric score with all criteria weighted equally.
-
Custom Points: The rubric will calculate a numeric score with some criteria weighted more heavily than others. Individual criterion cells in custom point rubrics dynamically scale when editing the criterion out-of value.
-
No Score: The rubric will display only text feedback, not a numeric score.
-
Percentage (only available if Holistic was selected as the rubric Type): A percentage can be assigned based on the level score of the associated activity.
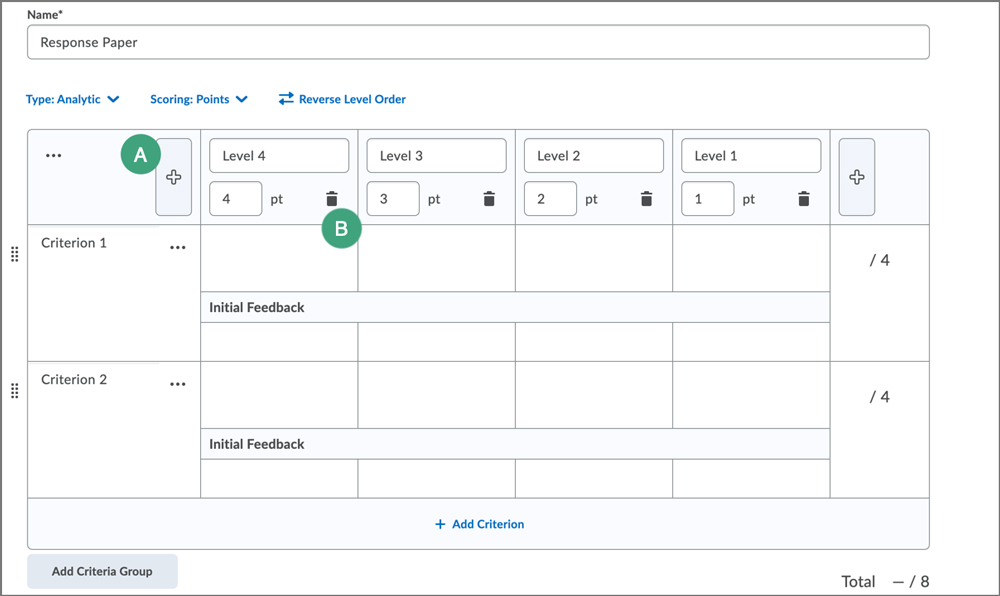
- To add levels, select the
+ button [A].
- To remove levels, select the
trashcan icon [B].
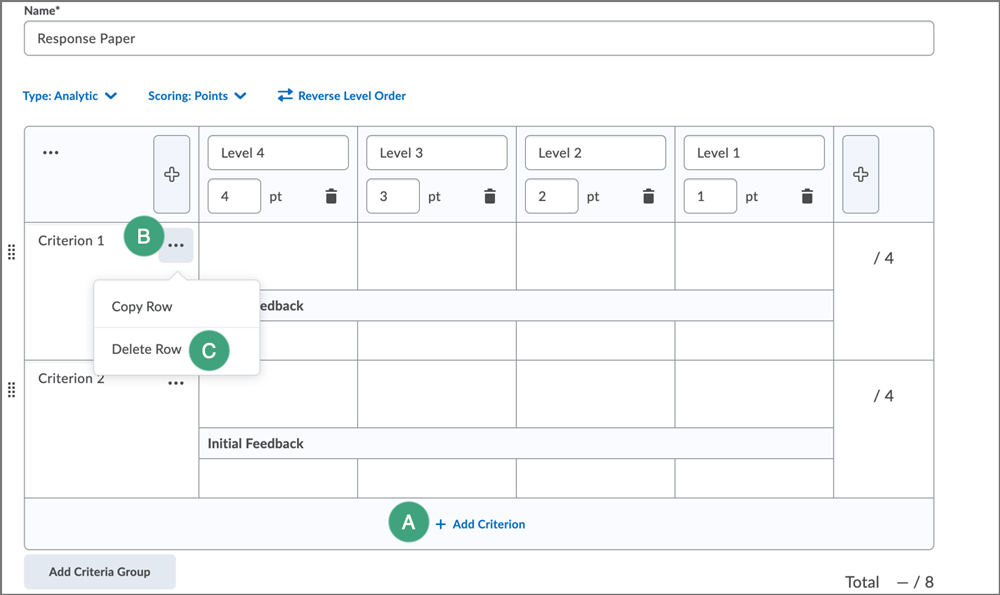
- To add a Criterion, select +Add Criterion [A].
- To remove a Criterion, select the
ellipsis [B].
- Then, select
Delete Row [C].
- All Level and Criteria text, as well as point values, can be changed by clicking in the corresponding field or box.
- To assess different aspects of an assignment separately, such as grammar usage and writing style, one can add more than one section or group of criteria. Each Criteria Group can include different descriptions and point values. To add the new group, select the
Add Criteria Group button.
- The Overall Score section totals the scores earned on each Level for each Criterion.
- Select Close when finished setting up the rubric.
Set Additional Options for Rubric and Score Visibility
Choose if the rubric will be visible to students and when. D2L has three options for rubric visibility and the option to hide scores, both listed under Options. If necessary, select the dropdown arrow to expand Options.
-
Rubric is visible to learners: Students will be able to see the empty Rubric before submitting work, and then see a link to the graded Rubric once assessments are published.
-
Rubric is hidden from students: Only instructors, TAs and Graders will see the rubric attached to a tool.
-
Rubric is hidden until feedback published: Students will see a link to the graded Rubric once assessments are published.
-
Hide scores from students: If this box is checked, students will still see check marks without a numerical score in each Level and the Overall Score Level in the rubric. The published score for the entire assignment will appear in the Score field.
Change the Status of a Rubric from the Rubrics Homepage
- Select Edit Course in the course navigation bar
- Select
Course Administration from the dropdown menu.
- Select Rubrics under the Assessment heading.
- Select the
dropdown arrow [A] next to the name of the rubric.
- Select
Set Status [B].
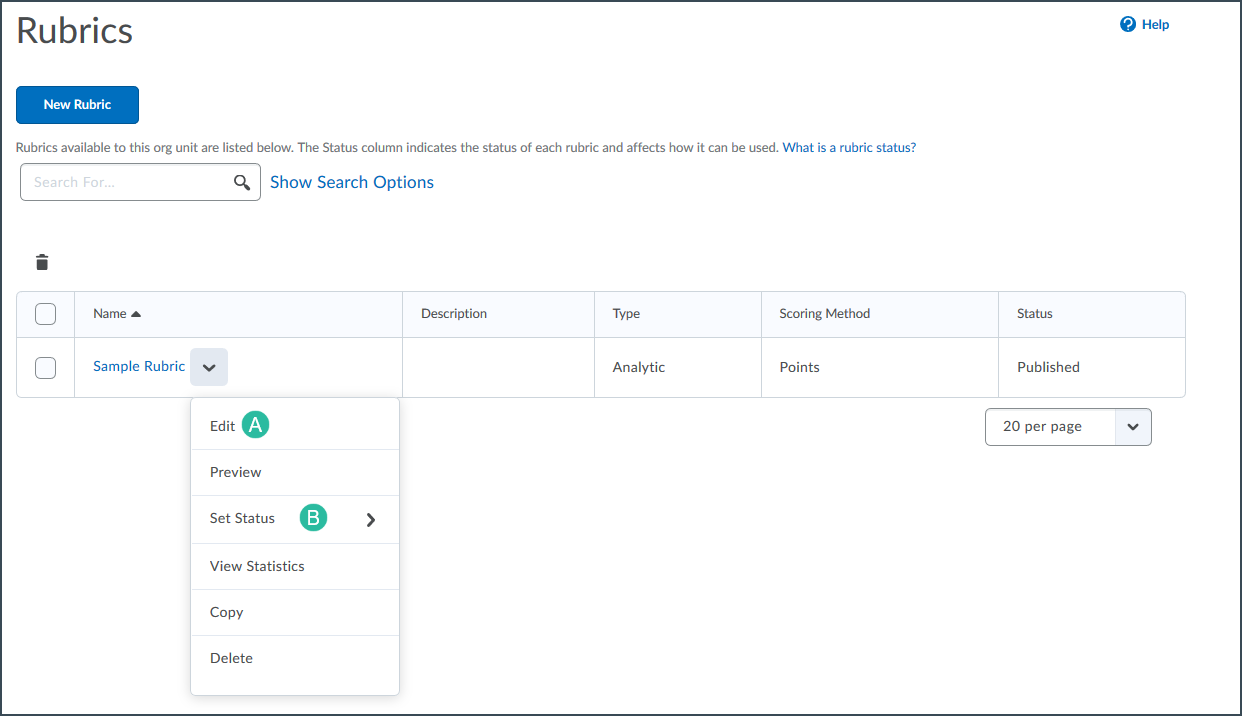
- Select Published.
Note: Keep in mind that before a rubric can be linked to an assessment item in D2L, it needs to be "Published".
Associate a Rubric with a Submission Folder
When a rubric is associated with a Submission Folder, this makes it so that the criteria are available to students before submitting an assignment. It also allows instructors to easily grade Submissions with the rubric.
- Go to the Submissions area.
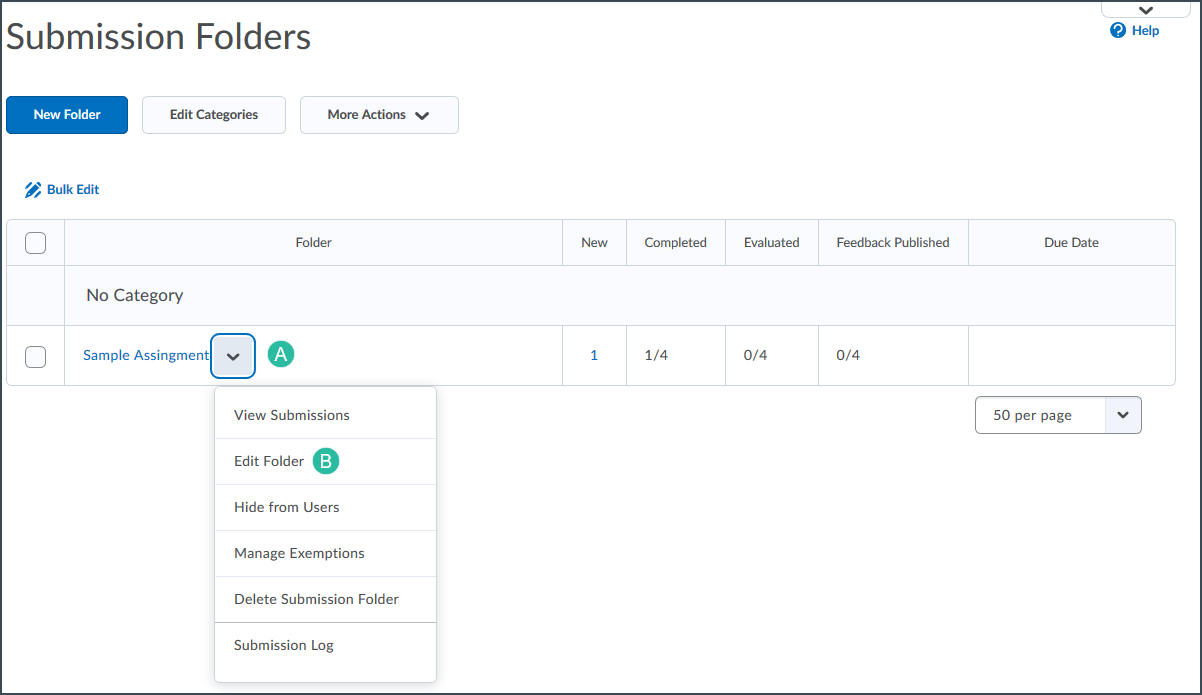
- Select the
dropdown arrow [A] next to the name of the submission folder.
- Select
Edit Folder [B].
- Under the Evaluation and Feedback section, select Add Rubric.
- The Select Rubric window will open. Select the
checkbox next to the rubric that needs to be associated.
- Choose
Add Selected.
- Select
Save and Close.
Associate a Rubric with a Discussion Board
- Go to the
Discussions area.
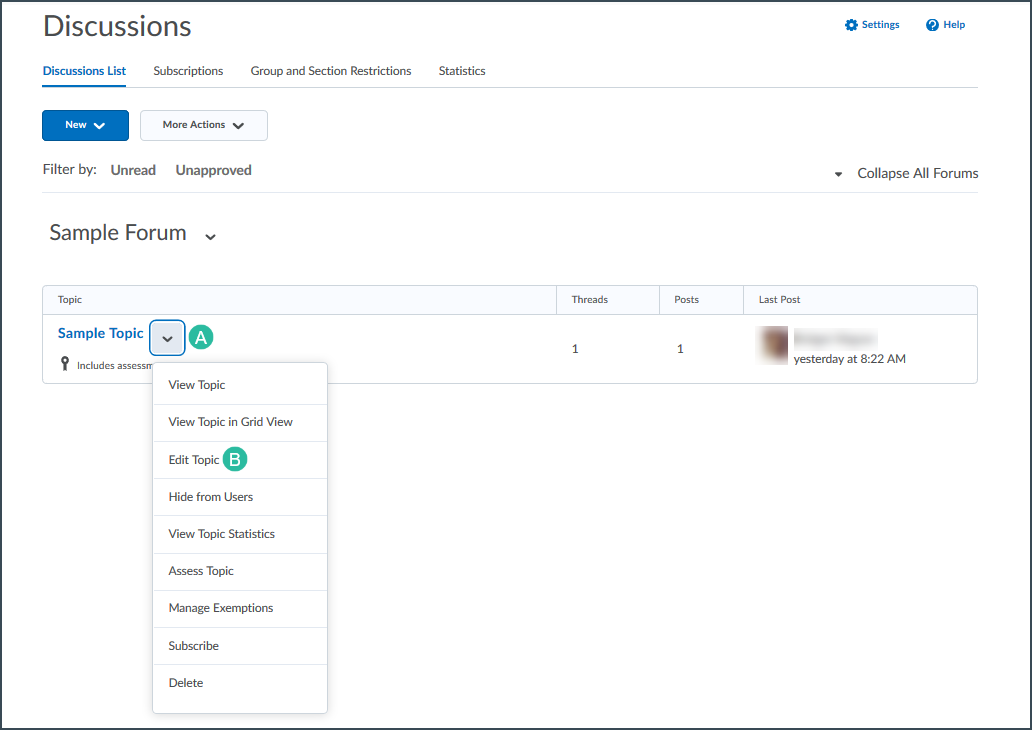
- Select the
dropdown arrow [A] next to name of the discussion topic.
- Select Edit Topic [B].
- Select the
Evaluation & Feedback tab.
- Select Add Rubric.
- Select
Create New or
Add Existing. If creating a new rubric, see Creating a Rubric.
- If adding an existing rubric, a popup window will open. Select the
checkbox next to the rubric that needs to be associated.
- Choose
Add Selected.
- Select Save and Close.
Edit a Rubric
Once a rubric has been used to assess a student, only its textual components can be edited. If edits to the point values are necessary, make a copy of the existing rubric and then associate the new rubric.
- Select Edit Course in the course navigation bar.
- Select
Course Administration from the dropdown menu.
- Select
Rubrics under the Assessment heading.
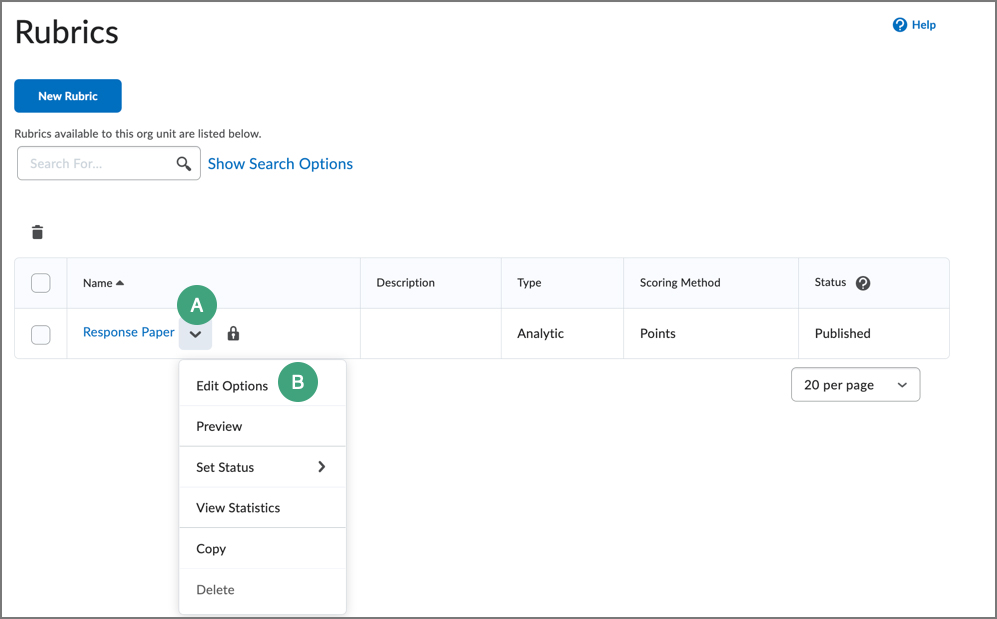
- Select the
dropdown arrow [A] next to the name of the rubric.
- Select
Edit Options [B].
- The "Edit" page will open with the following message: "The rubric is locked to structural changes because it has already been used to assess learner work." Select
Edit Text next to this message.
- A warning message will open with information about how the edits will be applied. Once reviewed, select
Edit Text.
- Make any changes to the text areas of the rubric. These changes will be applied to past and future evaluations with the rubric.
- When finished, select
Close.
Copy a Rubric
Rubrics can be copied if changes to point values must be made after a rubric has been used for evaluation. The copy will need to be associated with the activity to be used.
- Select Edit Course in the course navigation bar.
- Select
Course Administration from the dropdown menu.
- Select
Rubrics under the Assessment heading.
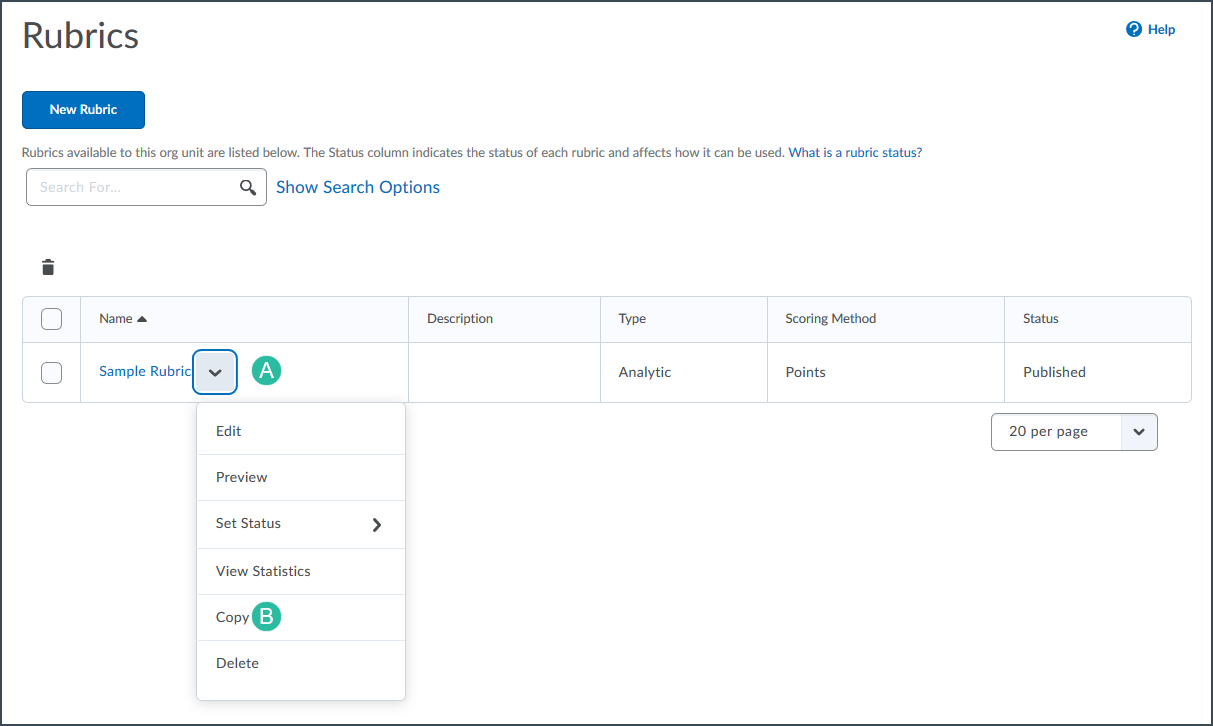
- Select the
dropdown arrow [A] next to the name of the rubric.
- Select
Copy [B].
- Select the name of the copied rubric.
- Replace the name of the rubric with a new name.
- Make changes to the rubric's properties, levels or criteria if needed.
- To associate the new rubric to a grade item, follow the steps for "Associating a Rubric with a Discussion Board" or "Associating a Rubric with a Submission Folder."
Grade a Submission with a Rubric
- Select Submissions in the course navigation bar.
- Select the
name of the submission folder.
- Select the
name of the file that needs to graded.
- Select the
name of the rubric associated with the submission folder. It is listed under the Evaluation and Feedback section.
- The rubric will appear in a new window. Select the
box for the level the student achieved for each criterion. As scores are selected for each criteria, the rubric will automatically update the overall score.
- Select
Add Feedback in the criteria column to enter qualitative feedback.
Note: Selecting the X in the feedback window will clear all text that was just entered.
- The rubric will automatically save as information is entered. When finished scoring the rubric, select
Close.
- Select Save Draft or
Publish.
Note: Until Publish is selected, all assessments and feedback entered are hidden from student view.
Grade a Discussion Post with a Rubric
- Select
Discussions in the course navigation bar.
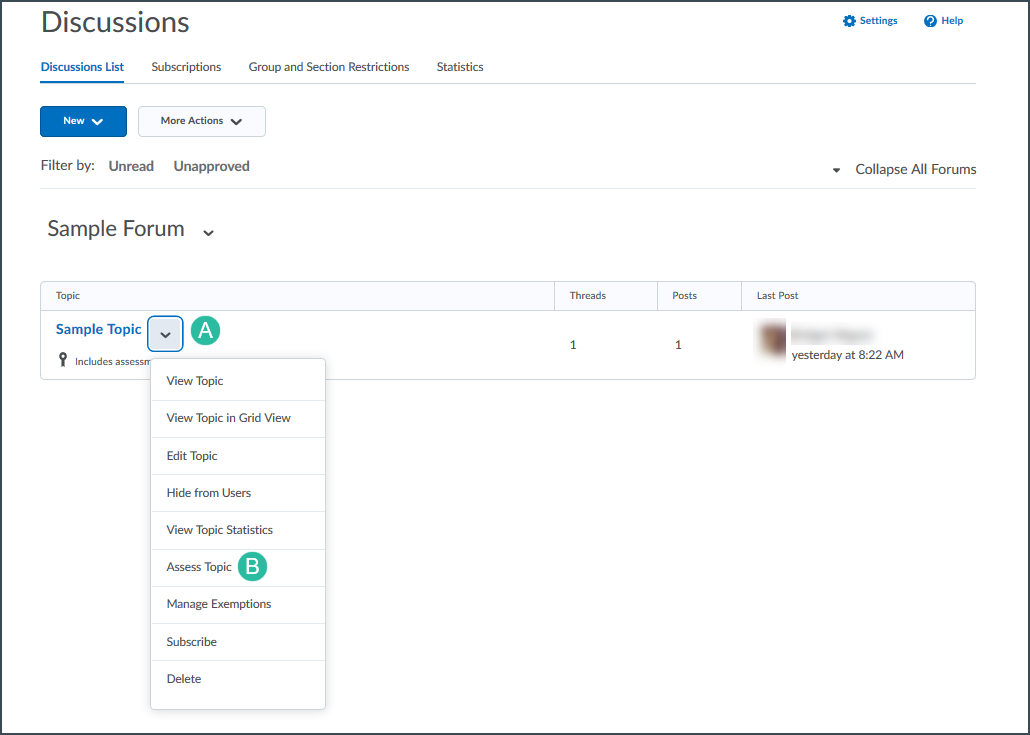
- Select the
dropdown arrow [A] next to the name of the discussion topic.
- Select
Assess Topic [B].
- For each student, select
Topic Score.
- The rubric will appear in a new window. Select the box for the level the student achieved for each criterion. As scores are selected for each criteria, the rubric will automatically update the overall score.
- Select Add Feedback in the criteria column to enter qualitative feedback.
- The rubric will automatically save as information is entered. Select Save Draft or Publish.