Intelligent Agents send an automated email when instructor-defined criteria are met. For example, instructors can email students who have not logged in recently, whose grades have fallen below a certain level, or who have viewed (or not viewed) specific topics in Content.
Instructors have access to Intelligent Agents in the following ways:
Create an Intelligent Agent
- Select Edit Course.
- Select Course Administration
- Select Intelligent Agents.
Note: If Course Administration page is set to show tools by category (the default), Intelligent Agents will be under the heading 'Communication'. If the Course Administration page is set to view by name, then Intelligent Agents are listed alphabetically.
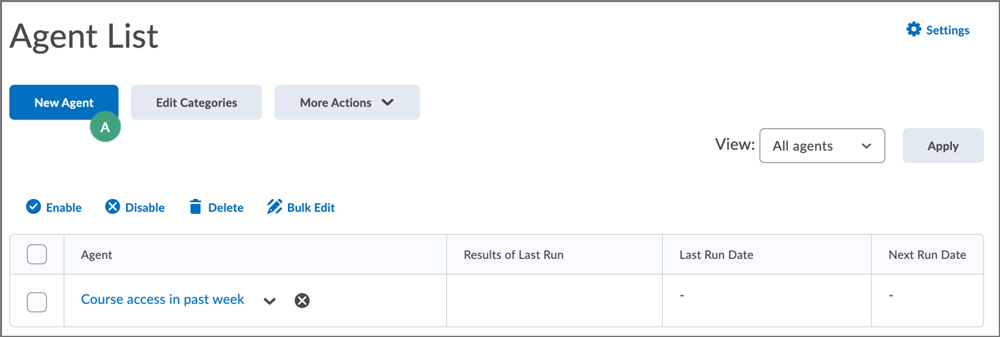
- The Agent List page will open. Select New Agent [A].

- Enter an agent name (required) and description (optional).
- Select
Agent is Enabled if the agent is to be active as soon as created.
- Under "Scheduling," select the
Frequency at which the agent should be activated.
Note: Intelligent Agents will be disabled once the course is inactive.
- Enter details related to the frequency of the agent as needed.
- Under "Criteria," determine the criteria the agent looks for:
- Under "Actions," indicate whether the agent should take action the first time the criteria are met or every time the criteria are met.
- Select
Send an email when the criteria are satisfied if users should receive an email if their actions satisfy the criteria.
- If an email will be sent, a Subject for the email will be required. Enter text within the "Message" field and attach files as needed.
- When finished, select
Save and Close.
Note: Attachments can be added to automated email messages when creating and editing intelligent agents. The intelligent agent email template contains an Attachments area that enables instructors to upload a local file or available course files, or record audio. Attachment size is based on the email attachment size setting for the organization.
Edit an Agent
-
On the Agent List page, select the
name of the agent to edit.
-
Enter any changes.
-
Select
Save.
Test an Agent with a Practice Run
This “practice run” will generate a report of students whose actions would meet the agent's criteria. In a practice run, no emails are sent. The list that is generated indicates who
would have been contacted with the given parameters of an agent, which allows instructors to test how a particular agent and settings would affect students.
- On the Agent list page, select the
dropdown arrow next to the name of the agent.
- Select
Practice Run.
- Select
Run.
- On the confirmation page, select
Done.
Run an Intelligent Agent Manually
If the agent is not set up to run on a schedule, it will need to be run manually.
-
Select the
dropdown arrow next to an agent on the Agent List page.
-
Select
Run Now.
-
A confirmation dialog box will open, select
Run.
Modify Intelligent Agent Email Settings
By default, intelligent agent emails come from "System - No Reply", and the reply-to email is "system_noreply@brightspace.com". It is recommended that this email be changed to an email that is monitored by a person.
-
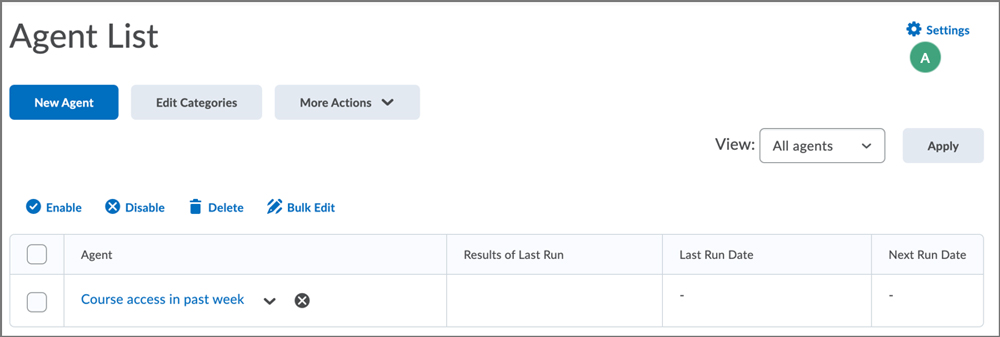
On the Agent List page, select
Settings[A].

-
Check "Set custom values for this course".
-
Enter the name the email should appear to be from . For example, "Professor Vincent".
-
Enter the reply-to email address that students should reply to. For example, "ProfessorVincent@depaul.edu".
- Select Save.
Note: Name and reply-to email address are global settings for all intelligent agents. They cannot be changed at an individual agent level.
Replace Strings for Intelligent Agents
Replace strings are specially formatted codes that can be entered into automated emails; they replace the need to enter information that might change from student-to-student. For example, to send a personalized message to each student in a class of 60, use the replace string {InitiatingUserFirstName}, and the names of the students will be filled in automatically.
See the table below for all of the replace string options and the text they generate. In the course, select
What replace strings can I use in the subject and message under the email subject text box to see a list of replace string options.
| {InitiatingUser} |
The user who performs the action that meets the criteria (for use in the "To" field). |
| {OrgName} |
The name of the organization |
| {OrgUnitCode} |
The code for the course (i.e., WRD_103_103_0990) |
| {OrgUnitName} |
The name of the course |
| {OrgUnitId} |
The id for the org unit |
| {InitiatingUserFirstName} |
The first name of the initiating user |
| {InitiatingUserLastName} |
The last name of the initiating user |
| {InitiatingUserUserName} |
The username of the initiating user |
| {InitiatingUserOrgDefinedId} |
The ID number of the initiating user |
| {LoginPath} |
The address of the login path for the site |
| {LastCourseAccessDate} |
The date the initiating user last accessed the course |
| {LastLoginDate} |
The date the initiating user last logged in |
Here is a sample email using replace strings:
Dear {InitiatingUserFirstName}, You did not logged into the {OrgUnitName} course site in the last week. Please remember that regular participation in course activities is essential for success in this course!
Please log in to the course site as soon as possible.
See you in class,
Dr. Vincent DePaul
In the example above, the name of each student and the course title will automatically appear when the email is sent. The bold text in the example below indicates what was added based on the replace string in the above example:
Dear
John,
You did not logged into the
Composition & Rhetoric II course site in the last week. Please remember that regular participation in course activities is essential for success in this course!
Please log into the course site as soon as possible.
See you in class,
Dr. Vincent DePaul