Gradescope is a tool designed to streamline and standardize paper-based, digital, and code assignments. It supports problem sets and projects as well as worksheets, quizzes, exams, and papers. Students can upload written assignments to be graded by an instructor or teaching assistant in an online interface that allows for spontaneous rubric creation and feedback. Gradescope is integrated with D2L with embedded links and grade book synchronization.
Set up Gradescope
To access Gradescope for the first time, instructors will need to create an account. This can be done by adding a link to Gradescope within a D2L course, which students can use to access Gradescope as well.
- Go to Content within the course to be set up with Gradescope.
- Navigate to the module where Gradescope will be added.
- Select
Existing Activities.
- Select
External Learning Tools.
- Select
Gradescope.
- A link to Gradescope will populate within the module. Select the
dropdown arrow next to the link.
- Select
Edit Properties In-place.
- Select the
box next to “Open as External Resource.”
- Refresh the page.
- Select the
Gradescope link to create the account.
View the instructional video on
Setting up Gradescope for more information.
Link a Course
D2L integration with Gradescope allows a course to be imported directly. Once the account has been set up, the course can be imported.
Note: While there is an option to create a course in Gradescope first and link to D2L after, this is not recommended. To ensure that the course name is consistent, it is recommended to link directly from D2L.
- Select the
Gradescope link created during account setup.
- A window will open with linking options:
- If a course has not yet been created in Gradescope, select
A new Gradescope course.
- If a course has been created in Gradescope, select
An existing Gradescope course. Use the dropdown menu to select the course.
- Select
Link Course.
- (Optional) Modify settings for grading in the course:
-
Negative Scoring: When grading an assignment, rubric points will be deducted from the total points available.
-
Positive Scoring: When grading an assignment, rubric points will be added to a starting point of zero.
Note: These settings can be altered later. See
Grading Submissions for more details.
See the instructional video on
Syncing a Course for more information.
Add Students to a Course
D2L integration allows instructors to import a roster straight from a D2L site. The roster will populate using the DePaul email addresses.
- From the Gradescope homepage, select the
course.
- Select
Roster.
- Select
Sync Brightspace Roster [A].

- A popup window will open. (Optional) Modify the email notification for students [A].

Note: If students will have access to Gradescope through Content or a News Item, the box next to “Let new users know that they were added to the course” can be deselected. Otherwise, an email will be sent to all students to provide access to Gradescope.
- Select
Sync Roster.
- If the email notification was turned off, instructors should direct students to the link to the Gradescope course within D2L so students can access their accounts. If the email notification was kept on, students will receive an email that they have been added to the course with a link to access their accounts.
Create Assignments
Gradescope has different assignment types to choose from. Assignments can be linked to grade items so that grades can automatically be transferred to the grade book in D2L after grading is complete. See
Creating a Grade Item for information.
- From the Gradescope homepage, select
Assignments.
- Select
Create Assignment.
- Select the assignment type:
-
Online Assignment:(Recommended) Instructors create questions directly on Gradescope. Students will be able to log in and submit responses within the Gradescope interface. For online assignments, instructors will not need to create an outline and will choose from various response types when creating the assignment. See
Creating an Online Assignment for a video guide on this type of assignment.
-
Exam/Quiz: This option is for templated assignments that are distributed via D2L or in the classroom. Students can download or print the template and upload their submission as a PDF. If printed, submissions can be scanned using Scannable (ios) or Genius (Android).
-
Homework/Problem Set: This option is for assignments that are not templated and may require more writing. Students can write their responses on notebook paper and take a photo of the submission using Scannable (ios) or Genius (Android) to upload as a PDF.
-
Programming Assignment: For this option, students submit code and instructors can automatically grade submissions with a custom written autograder and/or manually grade using the interface. If automatic grading is selected, instructors will need to upload an autograder as a second step in the assignment creation workflow. See
Programming Assignments for more information.
-
Bubble Sheet: This option is for scantron-style assignments that are completely multiple choice. Submissions can be automatically graded after the creation of an answer key. Gradescope will flag any responses that are not clearly marked. See
Bubble Sheet Assignments for more information.
- Enter a name for the assignment.
- Additional settings are available depending on the assignment type:
- Select the
Release Date textbox to choose a date and time to release the assignment.
- Select the
Due Date textbox to choose a due date and time.
- (Optional) Select the
box to Allow late assignments and enter a late submission date and time.
- (Optional) Select the
box to Enable Group Submission if this is a group project.
- Select
Create Assignment.
NEXT STEPS
For Online Assignments, see
Adding Questions to an Online Assignment,
Adding a Section Header and Linked File, and
Adding an Image to a Question.
For other assignments, an outline will need to be created next. See the Gradescope guide on
Creating an Outline.
Add Questions to an Online Assignment
After creating an online assignment, users will be prompted to add questions to an outline. Other assignments require a different kind of outline. See
Creating an Outline for information.
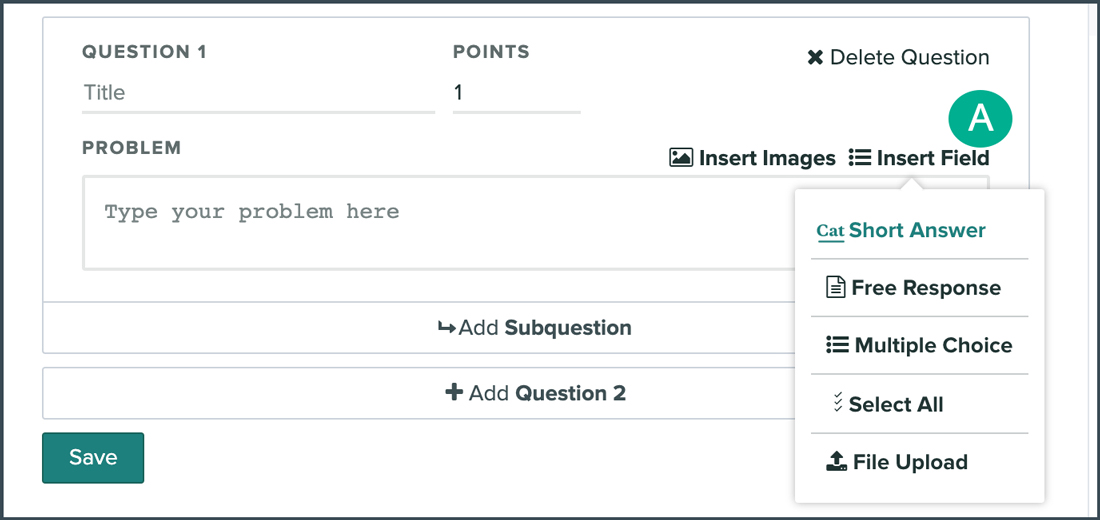
- On the “Edit Assignment” page, a blank question will populate. The default response type is short answer. To change the response type, select
Insert Field [A].

-
Short Answer: Prompts users to fill in a blank with a single correct answer.
-
Free Response: Provides users with a textbox to write a response. For more information, view
Add a Free Response Question.
-
Multiple Choice: Allows users to choose the correct answer from a list of options. Instructors can delete or add response options to the list using the parentheses as modeled in the textbox. For a video guide, see
Add a Multiple Choice Question.
-
Select All: Allows users to choose multiple correct answers from a list of options. Instructors can delete or add response options to the list using the brackets as modeled in the textbox.
-
File Upload: Provides users with a link to upload documents. View
Add a File Upload Question for more information.
- (Optional) Enter a title for the question.
- Modify the point value under “Points.”
- Type or paste the question into the “Problem” field.
- For multiple choice and select all response types, add the response options.
- Select
Add Subquestion to build a question off of another question or
Add Question to add another question.
- When finished, select
Save.
Preview an Assignment
Instructors can preview an assignment to see how students will interact with the questions.
- From the course dashboard, select the
assignment.
- If the “Manage Submissions” page does not open, select
Manage Submissions from the side menu.
- Select
New Submission [A].

For more information, view the video guide on
Previewing an Assignment.
Link an Assignment to a Grade Item
To transfer scores to D2L after grading assignments in Gradescope, a grade item will need to be created in D2L.
- Create a grade item in the grade book in D2L. See
Creating a Grade Item for instructions.
- From the course dashboard in Gradescope, select the
three dots corresponding to the assignment to be linked [A].
- Select
Assignment Settings [B].

- The settings page will open. Under the section “Brightspace Assignment” select
Link.
- A popup window will open. Select the
dropdown menu to choose the D2L grade item to be linked.
- Select
Link Assignment.
- The popup will close, and the grade item will be listed under the “Brightspace Assignment” section.
Grade Submissions Manually
Grading for Homework/Problem Sets, Exams/Quizzes, and Online Assignments in Gradescope is completed one question at a time using rubrics that either add points to zero or subtract points from a ceiling score. Rubrics can be built during grading to account for varying student responses or can be built during the creation of an assignment and edited during the grading process. Changes made to rubrics during grading will be applied to all previously graded submissions for the assignment. For help with grading assignments automatically, see the Gradescope help page on
AI-Assisted Grading.
- From the Gradescope dashboard, select
Assignments.
- Select the
name of the assignment to be graded.
- Select the
question to be graded.
- The first submission will open. Use the rubric to assign point value:
-
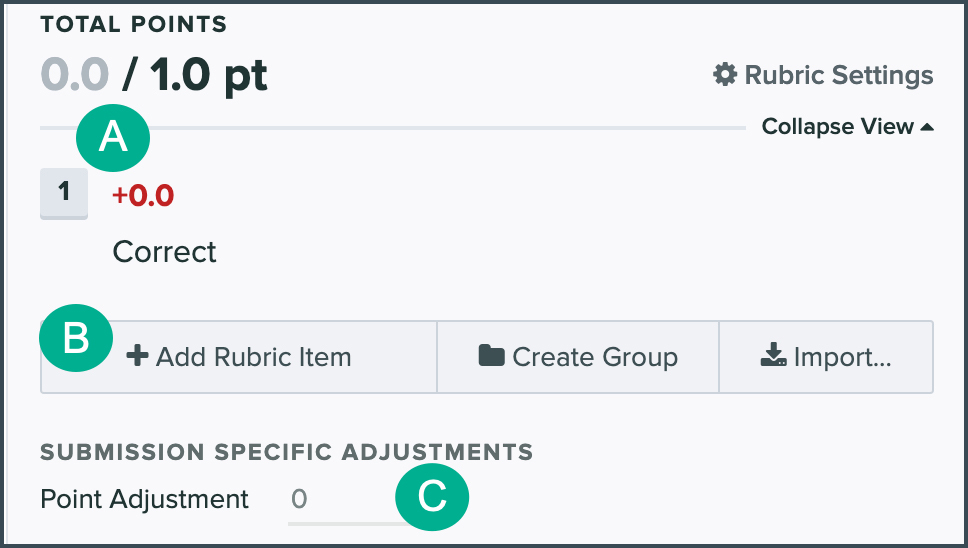
If using positive scoring, the rubric will add points to zero:
- Select the
default rubric item [A] if the answer is correct. This gives the student all available points for the question.
- Select
Add rubric item [B] to add a new item in order to specify a different point value (like half credit). Then, select that
item or hit the keyboard shortcut (the number next to the rubric item) to provide the score.
- To alter points only for the individual submission, use the “Point Adjustment” field [C].

-
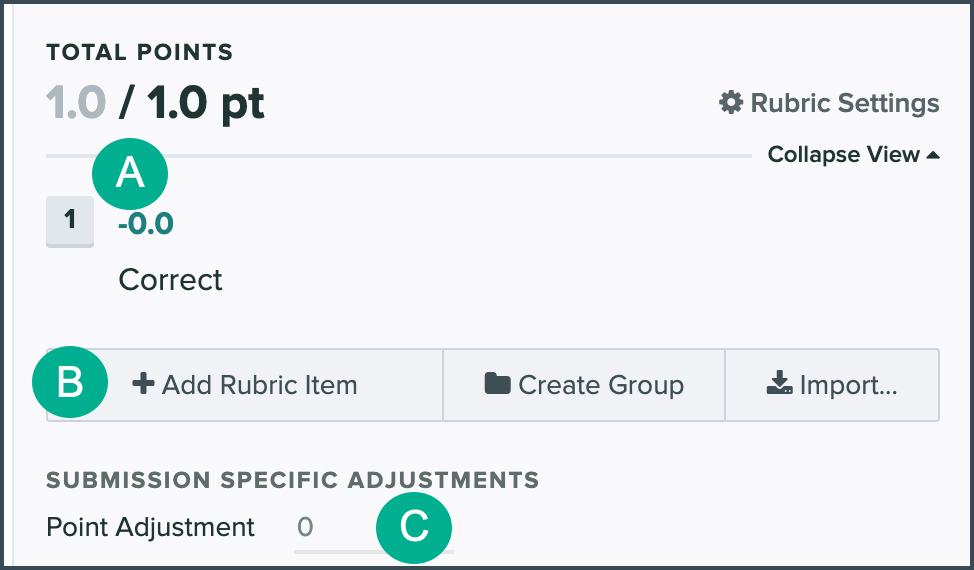
If using negative scoring, the rubric will subtract points from the maximum score:
- Select the
default rubric item [A] if the answer is incorrect. This will subtract the full point value of the question from the score.
- Select
Add rubric item [B] to add a new item in order to specify a different subtracted point value (like half credit). Then, select that
item or hit the keyboard shortcut (the number next to the rubric item) to subtract the points.
- To alter points only for the particular submission, use the “Point Adjustment” field [C].

Note: Default settings for grading can be changed in Course Settings, while settings for an assignment can be changed in the Assignment Settings. To modify the rubric style for just one question, use the “Rubric Settings” option within the grading interface.
- (Optional) Provide qualitative feedback or use the dropdown menu to apply previous comments to the individual submission.
- (Optional) Exam/Quiz and Homework/Problem Set assignments allow for annotations. Hover the cursor over the submission to bring up the annotations tools:
-
Finger Icon: Use this to grab and move the submission.
-
Textbox: Add text anywhere in the submission.
-
Pencil Icon: Draw freehand on the submission.
-
Boxes: Draw boxes on the submission.
-
Eraser Icon: Once selected, select any other annotation to erase.
- Select
Next Ungraded to save the score and move on to the next submission.
Note: The default grading method in Gradescope is one question at a time. To continue grading the same submission, use the dropdown menu next to the question title to select the next question for the same submission.
Post Grades
Once grading has been completed, grades can be published. When a grade is published in Gradescope, students will be alerted only within Gradescope. If an assignment has been linked to a grade item in D2L, grades can be posted to D2L from Gradescope.
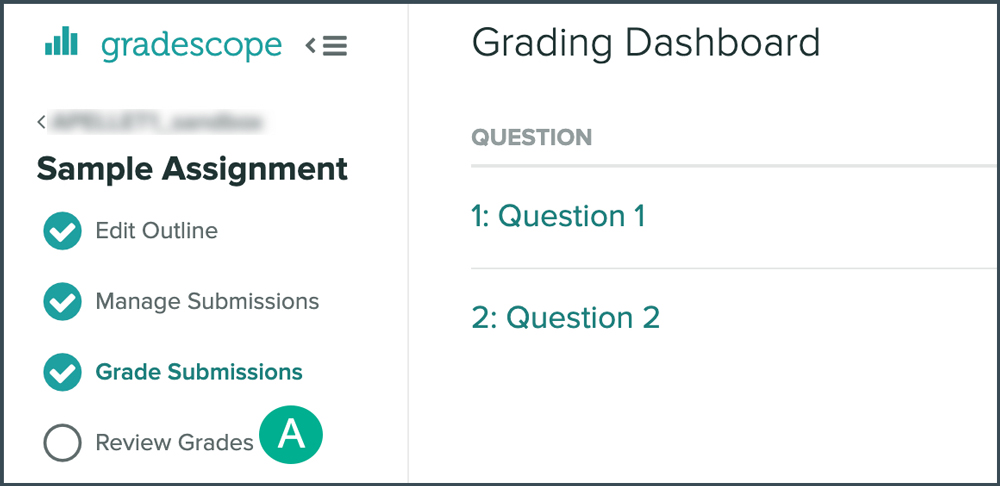
- If not selected already, go to the assignment. If all submissions have been graded, the “Review Grades” page will open. If it does not, select
Review Grades from the steps listed under the assignment name [A].

- From the “Review Grades” page, select
Post Grades to Brightspace.
- A popup will open listing the course and grade item. Select
Post Grades.
- Select
Publish Grades to publish grades in Gradescope as well.
- (Optional) After grades have been posted in Gradescope, select
Compose Email to Students to send an email regarding grades.
Student Guides
Students can find a number of instructional guides on the
Gradescope Student Help page.