The Manage Dates tool can be used to change dates for Calendar items, Checklists, Content topics, Discussions, Grades, News items, Quizzes, Submission folders, and Surveys. For other tools, dates must be adjusted manually within the tool. The Manage Dates tool will not adjust dates manually typed into Submission folder instructions, Content topics, Discussion instructions, etc.
The Manage Date tool also provides a method for bulk offsetting dates in a course as well as a sortable table view, which can be filtered by tool type. Instructors can edit dates for individual items as well as for multiple items at once.
Access the Manage Dates Tool
- Select
Edit Course in the course navigation bar.
- Select
Course Administration.
- Select
Manage Dates, located in the "Site Resources" section.
Bulk Offset Dates in a Course
The Manage Dates tool can be used to quickly update dates throughout a course. See
Course Copy for information on importing course materials from a previous course offering to a new quarter.
Note: Due dates for Discussions cannot currently be modified via the Manage Dates tool. Those dates still must be changed within Content.
- Select Edit Course in the course navigation bar.
- Select Course Administration.
- Select Manage Dates, located in the "Site Resources" section.
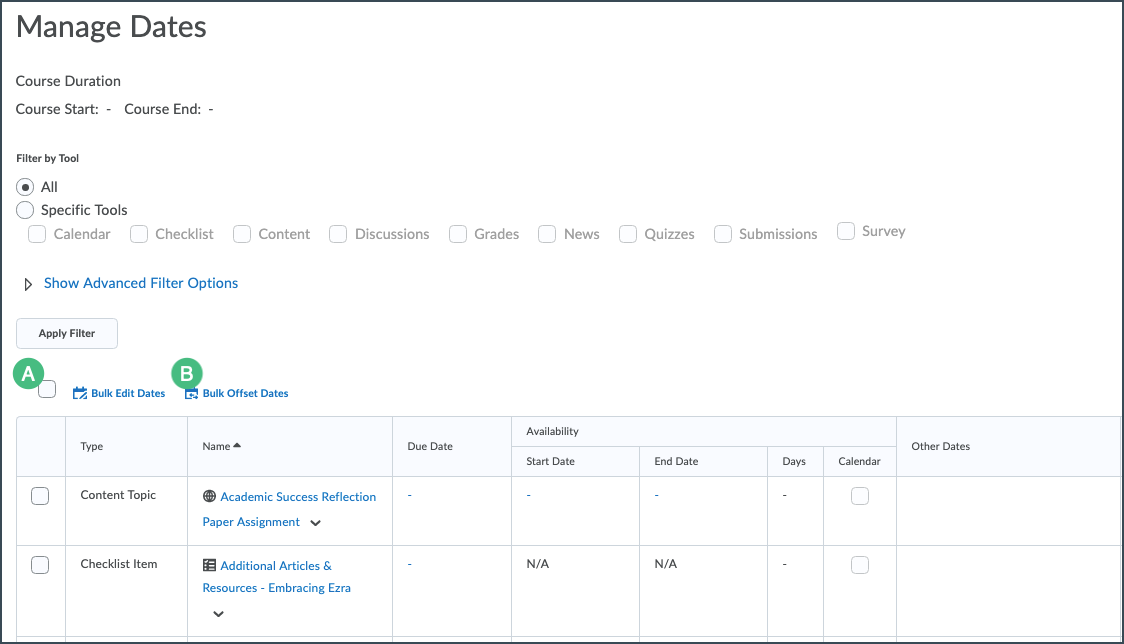
- A table that lists all of the items in the course will be displayed. Select the select box [A] at the top-left corner of the table to select all items in the table.
- Select Bulk Offset Dates [B].

- The Bulk Offset Dates window will open. Select the dates that should be offset.
- Select how the dates should be offset:
- Offset by direction and range: select then number of days and hours to move the dates forward or backward
- Calculate range between two dates: select two dates and D2L will calculate how many days/hours to update forward/backward. A good practice is to enter the start date of the course, the last time it was taught, it in the "From" field. Then, enter the start date for the new offering of the course in the "To field." The number of days between these dates will be displayed. This is the number of days that start and end dates will be pushed forward.
- Select
Save.
Note: Items that previously had no start and end dates set will not be affected by this process, even if they are selected.
Edit Start and End Dates for a Single Item
- Select Edit Course in the course navigation bar.
- Select Course Administration.
- Select Manage Dates, located in the "Site Resources" section.
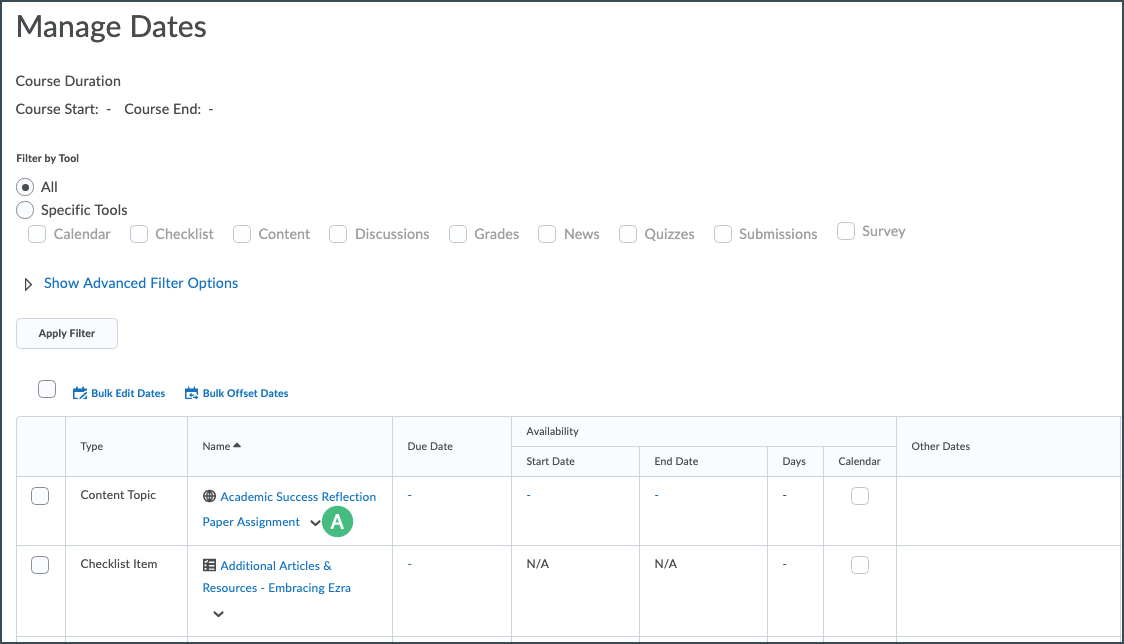
- A table that lists all of the items in the course will be displayed. Select the dropdown arrow [A] next to the item name.

- Select
Edit Dates.
- The Edit Availability window will open.
- Enter new start and end dates.
- Select
Display in Calendar to display the item end date in the Calendar.
- Select
Save.
Edit Dates for Multiple Items
Use these instructions to assign the same start, end, and/or due dates to several items at once. This process can also be used to display multiple items in the Calendar without changing any of the start or end dates for the items.
- Select Edit Course in the course navigation bar.
- Select Course Administration.
- Select Manage Dates, located in the "Site Resources" section.
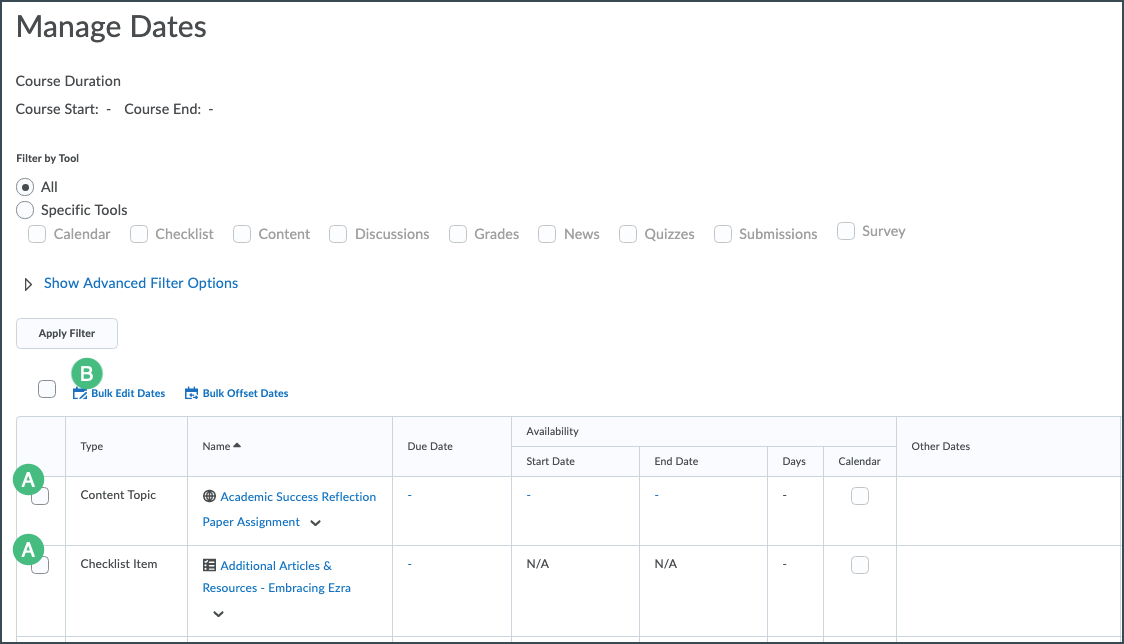
- A table that lists all of the items in the course will be displayed. Select the items to be changed [A]. All selected items will have the same date.
- Select Bulk Edit Dates [B].

-
The Bulk Edit Dates window will open. Select
Due Dates,
Start Dates, and/or
End Dates to modify dates. If a date type is not selected, that date will not change for the items.
-
Modify the date and time.
- To set a new date for the selected items, leave
Set selected in the dropdown menu.
-
To remove a date restriction from the selected items, select
Remove from the dropdown menu.
- Select Display in Calendar to have the dates added or removed from the Calendar.
- To have the dates displayed in the Calendar, select
Add to Calendar.
- To have the dates removed from the Calendar, select
Remove from Calendar.
- Select Save.